


How to Transfer Photos from Google Pixel 9 to Computer
If you would like to have a more well-rounded experience of using Android system, then most people should introduce you to try Google Pixel. Based on Google's routine for releasing the Pixel phones, the new Google Pixel 9 will be released officially soon. However, as rumored, this time has something different. Pixel 5 uses Snapdragon 765G instead 865G, which is definitely slower than 865, but also a powerful chip that is capable of 5G connectivity.
Certainly, the advantage is that this action will balance the mobile phone price and performance. That’s a piece of good news for users. Also, it has some progresses in both battery and camera. With a dual-camera system, you can get more dedicated pictures from your phone. So today we’re going to talk about how to transfer photos from a new Google Pixel 9 to a computer.
![]()
- Method 1. Transfer Google Pixel 9 Photos to Computer Selectively (Windows/Mac)
- Method 2. Transfer Google Pixel 9 Photos to Computer on One-Click (Windows/Mac)
- Video Tutorial: Two Ways to Transfer Google Pixel 9 Photos to Computer
- Method 3. Transfer Google Pixel 9 Photos to Computer via Photos App (Windows 10)
- Method 4. Transfer Google Pixel 9 Photos to Computer by Google Drive
Method 1. Transfer Google Pixel 9 Photos to Computer Selectively (Windows/Mac)
If you’re finding an all-in-one Google Pixel photo manager, you come to the right place. Then you should try Syncios Manager, free version. It’s a lifesaver that provides the quickest solution for all of us to transfer types of phone files between 6000+ models of mobiles phone and computer. Except for photos, it also enables you to manage videos, music, contacts, messages, app in a really simple way without any hassle.
No matter you’re not good at using computer, or you’re the elderly whose eyes are easy to get tired, Syncios can help you finish the task with ease. Now let’s see the detailed steps:
Syncios Mobile Manager
![]() Sync contacts, messages, call history, audio, photos, videos and other contents to computer.
Sync contacts, messages, call history, audio, photos, videos and other contents to computer.
![]() Import photos, videos, audios and more media files from computer to iOS/Android devices.
Import photos, videos, audios and more media files from computer to iOS/Android devices.
![]() Use your device as an external USB Key for extra convenient storage.
Use your device as an external USB Key for extra convenient storage.
![]() One click backup and restore phone data.
One click backup and restore phone data.
![]() Fully compatible with the latest Android OS and iOS system.
Fully compatible with the latest Android OS and iOS system.
Step 1Haven't installed Syncios Manager to your computer? Timely tap on the Download button above to get one. After installing, run it on your computer.
Connect Pixel 5 to Computer
Step 2Connect your Pixel 5 via USB cable. Find 'About Phone' from Settings app, then tap on 'Build Number' for 7 times to enter into developer mode. Back to the last page to select 'Developer' options. Turn on the 'USB debugging' option.
Now, please check the on-screen prompt to authorize this PC. (Don't see any prompt? Reconnect the device or click on Show Again.) Tap on 'OK' option on your Pixel 5.

Transfer Pixel 5 Photo Album to Computer
Step 3In the home page, you will see 7 modules on the top toolbar. To transfer certain photo album form Pixel 5 to a computer, hit on 'Photos' to load. Wait for complete. All albums, the default album as well as the self-created albums will be listed here in a clear way.
Turn onto a target album, single-click to select, click on 'Export' button to transfer. Customize a save path before start transferring. When all get ready, tap 'Select Folder' option again to confirm and begin.
![]()
Transfer Pixel 5 Photos to Computer in Batch
To transfer photos from Pixel 5 in bulk, then you should double-click to enter an album. Check the photos you need one by one. Then, again, click on 'Select Folder' button to transfer the photos to computer.
![]()
Method 2. Transfer Google Pixel 9 Photos to Computer on One-Click (Windows/Mac)
Also, Syncios has launched different types of mobile assistant to address different needs. If you’re going to backup all photos at once before upgrading to a new phone, or before upgrading to a new system, you should find a one-click solution for help. At this point, we have to recommend you Syncios Data Transfer, which is a powerful tool enabling users to transfer data through different platform (Android/iOS), backup data to computer in a click (can singly choose certain type of data to transfer) and restore data to devices from iTunes/local backup files.
Step 1First of all, install and then launch Syncios Data Transfer and connect your Google Pixel 9 to the computer.
Haven’t enabled debugging mode on your Pixel 5? Click to skip to the Method 1, Step 2.
Syncios Data Transfer
![]() Backup all phone contents to computer in 1 Click, including photos, contacts, SMS, videos, music and etc.
Backup all phone contents to computer in 1 Click, including photos, contacts, SMS, videos, music and etc.![]()
![]() Transfer data from iPhone to Android, Android to iPhone, Android to Android, iPhone to iPhone in 1 Click.
Transfer data from iPhone to Android, Android to iPhone, Android to Android, iPhone to iPhone in 1 Click. ![]()
![]() 4 Restore Modes: to restore data from iPhone/Android/iTunes backup to iOS or Android devices.
4 Restore Modes: to restore data from iPhone/Android/iTunes backup to iOS or Android devices. ![]()
![]() Transfer songs or playlists from iTunes Library to an Android phone, iPhone, iPad and iPod touch.
Transfer songs or playlists from iTunes Library to an Android phone, iPhone, iPad and iPod touch.
![]() Fully compatible with the latest Android OS and iOS system.
Fully compatible with the latest Android OS and iOS system.
Step 2There’re 3 sections of the program. To backup all phone pictures, tap on 'Backup' option. The default save path is [C:\Users\Your name (e.g.: Cheryl)\Documents\], and the free storage space of this path will display on the Backup page. If there’s no enough space or you would like change a path, click on three dots icon to select. Then, click on 'Next' button to find the next page.
![]()
Step 3The page shows you the types of data that you’re allowed to backup. To transfer all pictures, Check 'Camera Roll' and 'Photo Library' option. Hit 'Next' to load the data. Then you can see the quantity of every chosen item as shown below. Tap 'Next' option again to launch a smaller window, choose the 'OK' option on it to start the whole process.
![]()
You can also learn from a video tutorial:
Method 3. Transfer Google Pixel 9 Photos to Computer via Photos App (Windows 10)
Seeking a solution that can finish transferring photos from your Pixel 5 to a Windows PC with Wi-Fi? Built-in Photos app should also be considered as an option. It can support to transfer Android/iOS devices/other digital devices pictures without using USB cable, but under the same network. Make sure you have a stable network, or simply connect your Pixel 5 with USB cable, then begin the process.
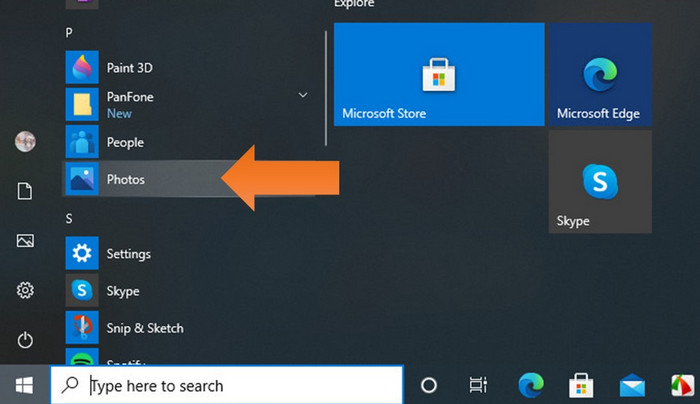
Step 1First of all, run Photos app on your computer (Windows 10 only). Tap on Start button, scroll up and down to find Photos option (the apps are listed in alphabetical order.). Plug in the Pixel 5 through a USB cable or connect it via Wi-Fi. Attention! Don’t forget to unlock the phone screen, then select 'Trust' option when receiving a prompt.
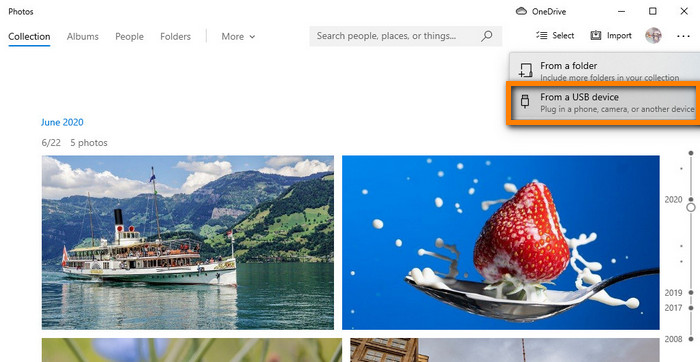
Step 2In the upper-right corner of Photos interface, tap 'Import' option, to find a drop-down list. Two available choices for you. They are 'From a Folder' and 'From a USB device'. The later option allows us to transfer data from one devices to PC. Thus click on 'from a USB device' option.
In no time, Photos app will automatically search for devices that are ready for data transfer. Choose your device name. On the small window, you can browse the thumbnails of data, check photos you need one by one, and then hit on 'Import x of x items' option to start transferring.
Method 4. Transfer Google Pixel 9 Photos to Computer by Google Drive
Besides Photos app, you can use Cloud service. For example, use Google Drive. And you should know that every Google account has 15GB free storage space, otherwise, you need extra payment. Cloud service is definitely a convenient choice, but its con is that, sometimes the app will automatically access and then upload your data, just pay more attention to your privacy. Now, get started!
Step 1Firstly, open Google Drive app on your Google Pixel phone, then you need to upload the photos you want to the app. There’s a '+' button on the bottom right corner, click on it and then tap 'Upload' icon. Choose the pictures from your phone album, and save them to your Google account.
Step 2Secondly, you need to open a browse, go to Google Drive official website. Then, log in your Google account. Navigate to the folder that your photos stored on. Check the photos, right-click on it, and then select 'Download' option from the list. That’s it, done!
Conclusion
We summarized 4 effective methods to transfer photos from Pixel 5 to Windows or Mac. To transfer photos in bulk as requirement, free Syncios Manager is always the good choice. Or if you need to transfer all pictures at once, one-click Syncios Data Transfer can solve your problem. Certainly, if you only like connecting device via Wi-Fi, Photos app (windows 10) and Google Drive are available.