

 >
How-tos >
Android Backup >
>
How-tos >
Android Backup >
1-Click to Backup and Restore Samsung Galaxy S25/S25+/S25 Ultra
Planning ahead is the easiest way to make sure your data isn’t lost to the ether, even if your phone is destroyed. Now, almost everyone is a mobile user. All important files are stored in a small phone. A regular backup to your mobile phone becomes significant. If you are a Samsung Galaxy S25/S25+/S25 Ultrauser now, you are in the right place. You are going to get knowledge of two best ways to backup and restore Samsung Galaxy S25/S25+/S25 Ultraphone. Read all steps below to make a perfect backup to Samsung Galaxy S25/S25+/S25 Ultra.
Solution 1. Directly Backup and Restore Samsung Galaxy S25/S25+/S25 Ultra
You know you can do some transfer jobs with Samsung Smart Switch if you are a Samsung user. And Google provides a backup and restore service for Android devices. But, we are going to talk about a more powerful transfer tool. With Syncios Data Transfer, you can do more jobs for your Samsung Galaxy S25/S25+/S25 Ultra, not just 1-click backup and restore. Read all reasons below then you know why you need this tool.
- ❶: You can 1-click to backup and restore contacts, messages, call logs, calendars, photos, apps, videos, music on Samsung Galaxy S25.
- ❷: You can backup another iOS / Android device the restore the backup to Samsung Galaxy S25 when you need.
- ❸: You can check all backup files easily on computer.
- ❹: You can restore iTunes and iCloud backup to Samsung Galaxy S25 without overwriting the existing data.
- ❺: You can sync data from another iOS / Android device to Samsung Galaxy S25 directly.
- ➏: You can backup and restore Samsung Galaxy S25 on Windows PC or MacBook.
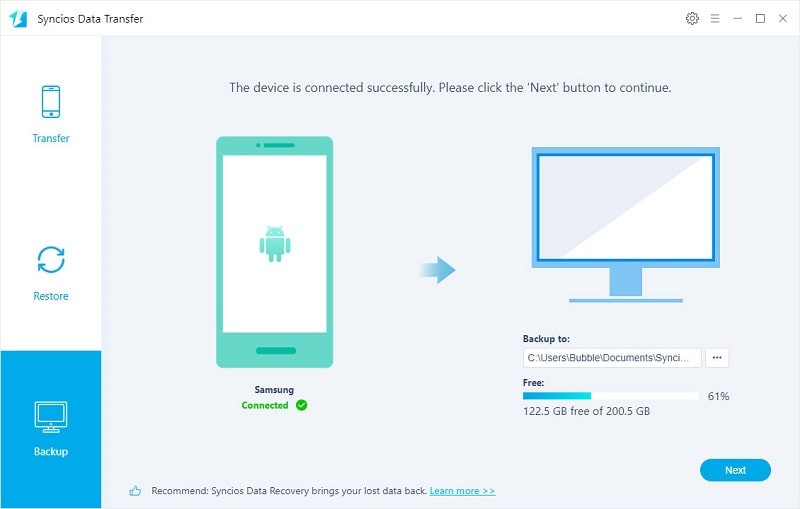
Step 1: Connect Samsung Galaxy S25 to Computer
Download and install Syncios Data Transfer on your computer. Windows version and Mac version are available. After its installation, go to the setting icon on the top right. Set the program language according to your need. Then get an USB cable to connect Samsung Galaxy S25 to computer. Unlock it as soon as you connect it to computer. Set the connection mode as Transfer File (MTP) on the phone. At the same time, also enable the USB debugging mode on your phone.
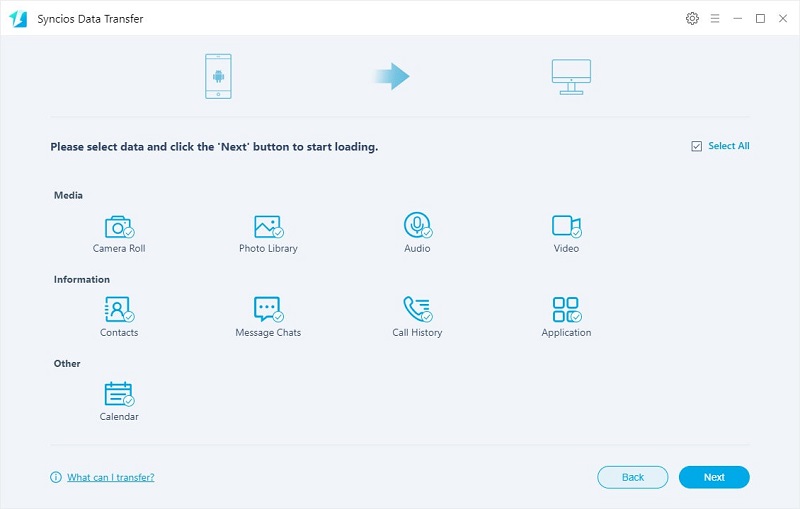
Step 2: Choose "Backup" mode
On the primary interface, you will see three modes: Transfer, Restore, Backup. Jump to Backup mode to backup phone data. Make sure there is enough space on your local disk. If you need to change a saving path, go to lower right to set a proper backup path. If your phone is connected well and the internet is stable, click on Next on the lower right.
Step 3: Backup Samsung Galaxy S25 to Computer
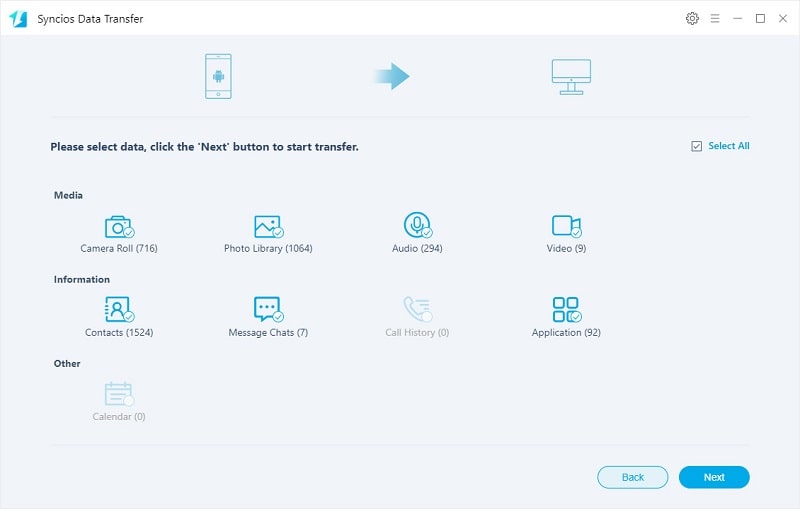
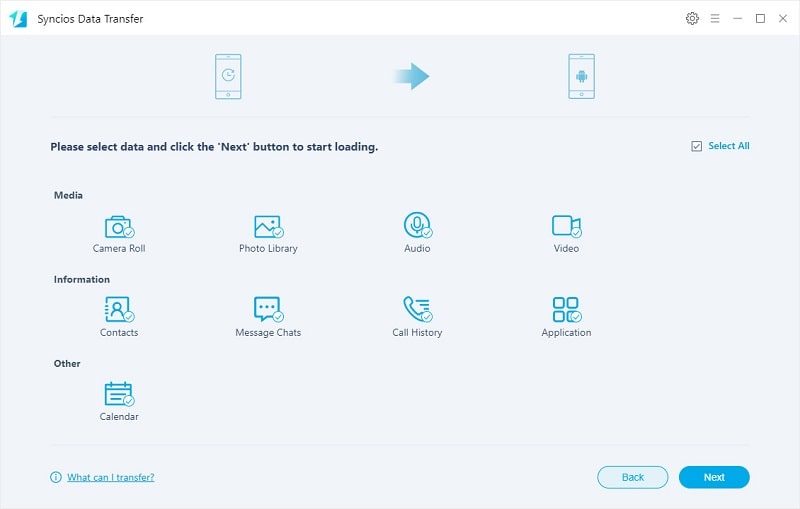
Choose contents you need, including contacts, messages, audios, videos, photos, calendars, apps and etc. You can choose to not backup all contents at once if you are busy on other things. After the selection, click on Next to load all files. At last, to initiate the backup, click on Next again.
Unlock your phones to make sure you will not ignore any prompts on your phone which remind you of allowing the access to your phone files. Then you will get a perfect backup. Check all backup files now in case some files is failed to backup.
Step 4: Restore Syncios Backup to Samsung Galaxy S25
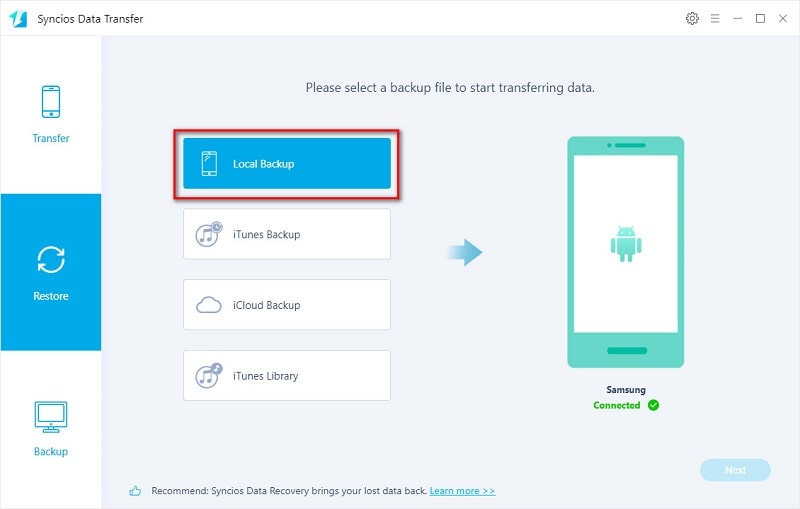
To restore backup to Samsung Galaxy S25, choose Restore > Local Backup. Syncios will load all saved backup. From the backup list, choose one you need according to its backup date and size. Then close the backup list and click on Next.
Choose contents you need to restore and click on Next to load all files. If you select Clear data before restore on the lower left, the data on your target device will be erased before the restoration. So be cautious. At last, to initiate the restore, click on Next again. Unlock your phone and check all prompts timely.
Solution 2. Selectively Backup and Restore Samsung Galaxy S25/S25+/S25 Ultra
If you just want to backup part of data on Samsung Galaxy S25/S25+/S25 Ultra, you need this solution provided by Syncios Mobile Manager. It's a mobile manager tool which could do better when you need to manage phone data. Check what it can do for you specifically.
- ❶: You can selectively export and import media files, including photos, photo albums, songs, videos on Samsung Galaxy S25.
- ❷: You can selectively backup contacts, messages, apps on Samsung Galaxy S25.
- ❸: You can selectively backup another iOS / Android device the restore the backup to Samsung Galaxy S25 when you need.
- ❹: You can preview, edit, delete files on your Samsung Galaxy S25.
- ❺: You can check all backup files easily on computer.
- ➏: You can find a Phone Transfer tool (Syncios Data Transfer) under its Toolkit column.
- ❼: You can get other handy tools: online video downloader, ringtone maker, audio converter, video converter.
Step 1: Connect Samsung Galaxy S25 to Computer
Download the free version of Syncios Mobile Manager to computer. Windows version and Mac version are available. Get Samsung Galaxy S25 connected to computer via USB cable. According to Syncios instructions, you need to enable the USB debugging mode on your connected Android device. Then choose "Transfer File" connection mode. Unlock your phones in case any prompt is ignored. All those steps ensure a successful connection.
Step 2: Backup Samsung Galaxy S25 to Computer
On the left sidebar, find the content list. Choose contents you need from Samsung Galaxy S25 then click on Export option to transfer media files (photos, songs, videos) from Samsung Galaxy S25 to computer. Click on backup option to backup contacts, messages, apps from Samsung Galaxy S25 to computer
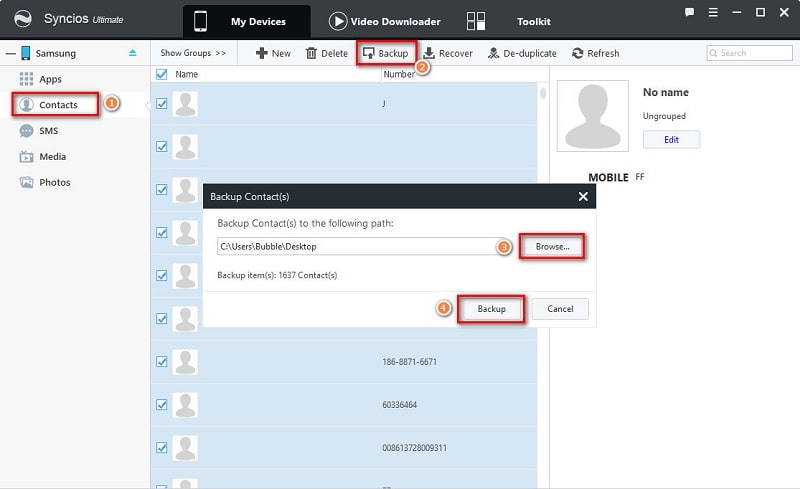
For instance, to backup contacts, tap Contacts to load all contacts on your Samsung Galaxy S25. Here you are able to backup, restore, delete and edit contacts. Check and edit contacts if you need. Then select contacts you need then click on Backup on the menu bar or just tick off the check box in front of Name above all contacts to select all contacts at once. Click on Browse to select a proper output location. Then click on Backup to save contacts from Samsung Galaxy S25 to computer.
Step 3: Restore Files from Computer to Samsung Galaxy S25
To restore backup to Samsung Galaxy S25, click on Add/Import to import media files and apps from computer, or click on Recover to restore the new created backup of contacts, messages.
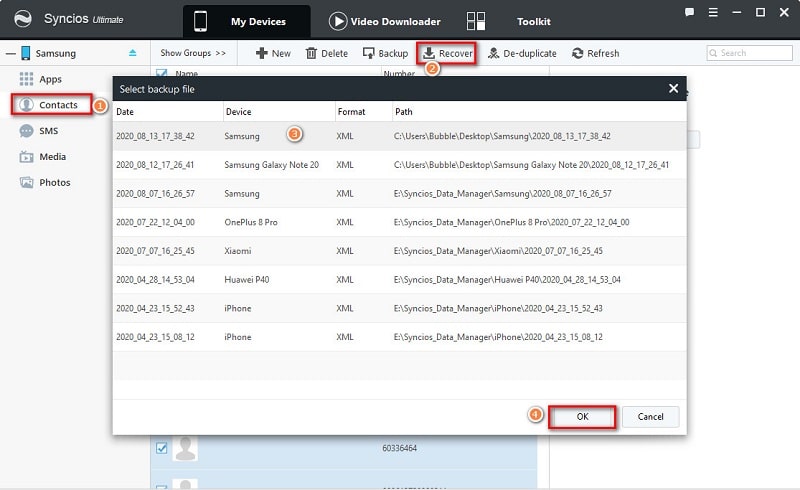
For instance, if you need to restore backup to Samsung Galaxy S25 one day, just navigate to Contacts then click on Recover to load all created backups by Syncios. From the backup list, choose the one you need and click on OK to start the restoration. Do not disconnect your Samsung Galaxy S25 and check all prompts on your phone in time. The existing data is not overwritten. The backup will merge with the existing data on your Samsung Galaxy S25
Conclusion
This article provides 2 effective solutions to backup and restore your Samsung Galaxy S25. You can try all solutions or just skip to a solution you prefer. Locate a tool you feel most helpful. Whenever you need to backup and restore data on Windows PC or MacBook, this tool you choose helps you save a lot of time. If this guide helps, don't forget to share it with your friends.
Download Syncios Mobile Manager:
Download Syncios Data Transfer: