Recover Deleted Files from USB Flash Drive
 >
How to >
PC Recovery >
8 Ways to Recover Deleted Files from USB Flash Drive
In the modern environment, USB flash drives have become an important tool for data exchange and storage due to their portability and large capacity. For example, designers lose their USB presentation files, students mistakenly format their USB documents, and other emergencies, all of which are caused by misoperation, formatting, or malware, resulting in data loss, causing inconvenience or loss. Therefore, it is important to understand USB flash drive data recovery technology. This article will introduce eight practical strategies to help you deal with difficulties in recovering deleted photos, images, documents, apps, and other files from a USB flash drive. Mastering these methods can increase the success rate of data recovery and reduce trouble.
- Part 1: Immediate Steps When Files Go Missing from USB Flash Drive
- Check Recycle Bin on the Computer
- Stop Importing Files to USB Flash Drive
- Disconnect the USB Flash Drive
- Part 2: Recover Deleted Files from USB Flash Drive with Syncios D-Savior
- Part 3: Recover Deleted Files from USB Flash Drive with Windows File Recovery
- Part 4: Recover Deleted Files from USB Flash Drive with CMD
- Part 5: Restore Deleted Files from USB Flash Drive from Windows Backup
- Part 6: Restore Deleted Files from USB Flash Drive Using Previous Versions
- Part 7: Restore Deleted Files from USB Flash Drive Using File History
- Part 8: Restore Deleted Files from USB Flash Drive from Time Machine Backup
Part 1: Immediate Steps When Files Go Missing from USB Flash Drive
When you realize that the files on your USB flash drive have suddenly disappeared, your first reaction may be panic, but please stay calm. At this moment, every action may affect the success rate of data recovery. Let's take a few key steps in an orderly manner to pave the way for retrieving those precious files.
1.1: Check Recycle Bin on the Computer
Although files deleted directly from the USB flash drive will not usually appear here, if these files have been copied or moved to the computer's hard drive and then deleted, they may temporarily reside in the Recycle Bin. This is a simple but often overlooked step, and you may be surprised to find that the lost files are quietly waiting for you to recover.
1.2: Stop Importing Files to USB Flash Drive
This step is crucial because any new write operations may overwrite the data traces of the deleted files, greatly reducing the possibility of recovery. So, before determining the next step, make sure that no more write operations are performed on this storage device.
1.3: Disconnect the USB Flash Drive
This is not only an important step to prevent further data damage, but also like pressing the pause button, it gives you and your data a chance to breathe, and also provides the best state for subsequent professional rescue.
Through the above steps, we not only create a relatively safe environment for data recovery but also gain more opportunities to recover valuable data that seems to have disappeared.
Part 2: Recover Deleted Files from USB Flash Drive with Syncios D-Savior
After completing the initial emergency treatment, we can turn to more professional solutions. Syncios D-Savior is a very effective USB recovery tool that can scan and try to recover files that have been deleted but not yet overwritten. Syncios D-Savior software provides an intuitive and easy-to-use interface, and supports multiple file types such as pictures, videos, audio, apps, documents, and more than 1,000 file formats. With just one click, you can start a deep scan of the USB flash drive (even formatted) and provide a detailed preview so that you can accurately determine whether the file is needed. The tool can identify files that have been deleted but still exist on the storage medium, and then safely transfer them to another location for storage.
 Syncios D-Savior
- Recover data from a formatted disk, hard drive, lost partitions, emptied recycle bin, etc.
- Recover data from an SD card, TF card, SSD card, USB flash drive, other storage media.
- Recover 1,000+ formats of images, videos, audio, folders, archives, documents, etc.
- Save recovered data to any desired location, including external drives.
- Provide detailed file preview prior to recovery.
- Support recovering data while scanning.
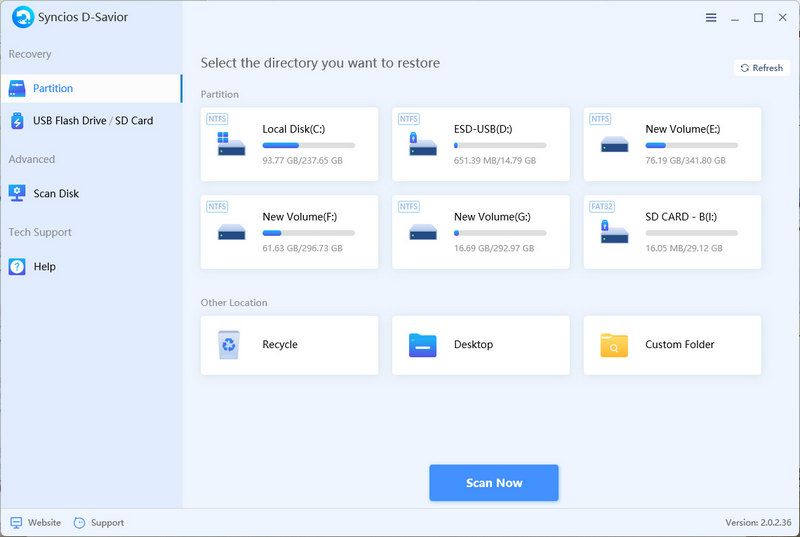
- Step 1: Once you've installed Syncios D-Savior, open this data recovery expert and head over to its main interface.
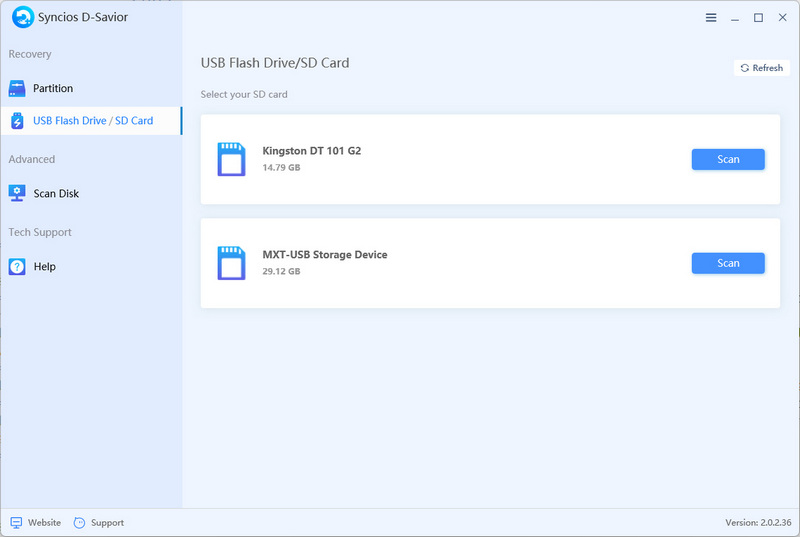
- Step 2: On the primary interface, all drives, including the target USB flash drive, are displayed. Instead, under the USB Flash Drive section, find your USB flash drive by its name and size. Once you've spotted it, just hit the "Scan" button to get started.
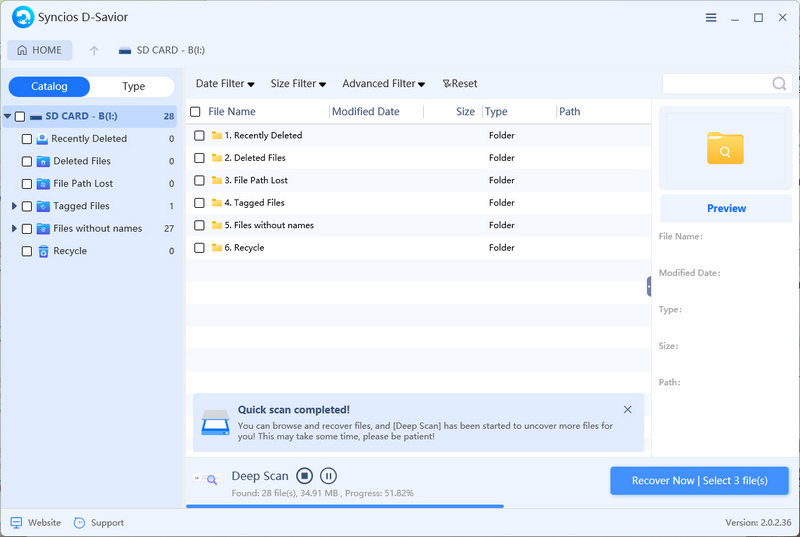
- Step 3: After a quick scan, you'll be able to track down the previously deleted apps by either their file path or file type. As soon as the lost files pop up, you have the choice to recover them right away without having to wait for the entire scan to finish.
- Step 4: Pick the files you want and click "Preview" on the right panel to make sure they're the ones you need to restore. Keep in mind that due to formatting, some information might be corrupted, causing filenames to be lost. But don't fret, you can still identify the files based on their size, type, modification date, and original location.
- Step 5: After selecting the files you need, click "Recover Now".
- Step 6: Next, click "Directory" to choose a folder where the recovered files will be saved. Hit "Confirm" to begin the recovery process.
- Step 7: Once the recovery is done and you get a confirmation, click the "Recovered" button to open the folder and verify that the files have been successfully restored and are ready for use.
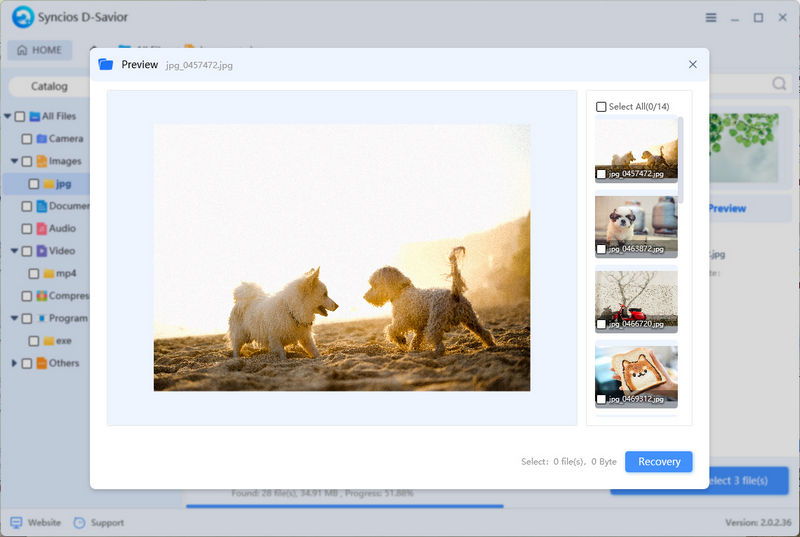
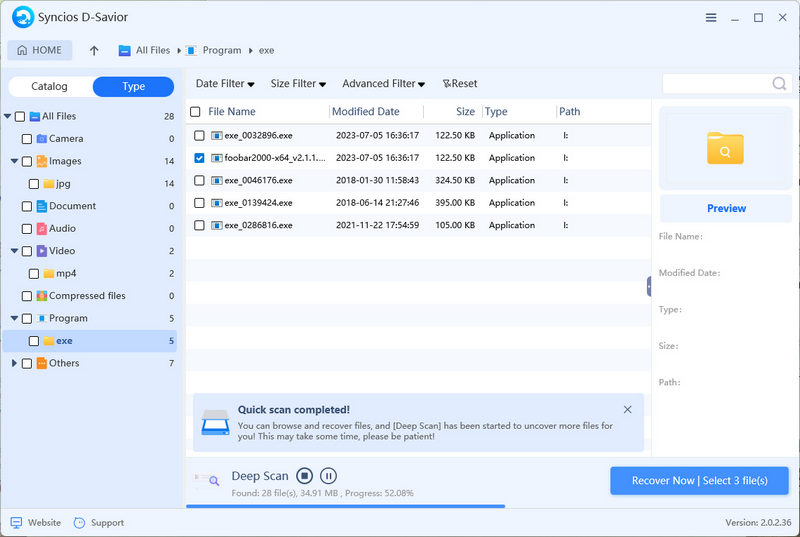
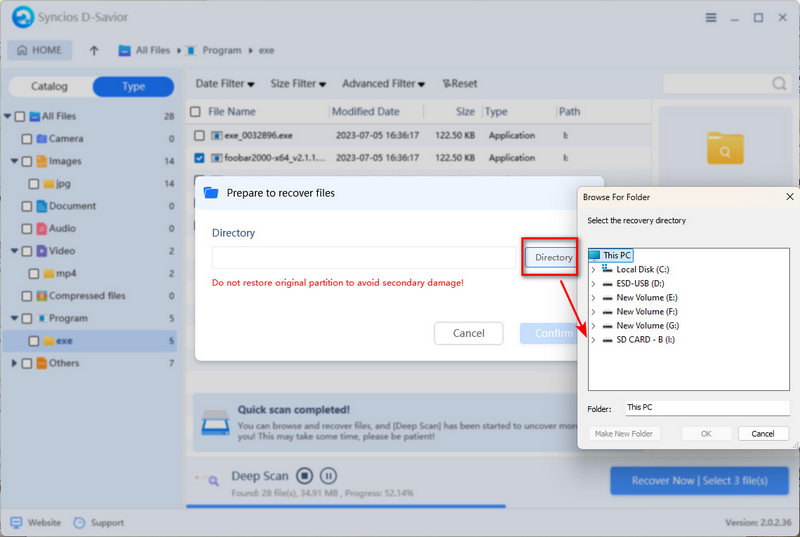
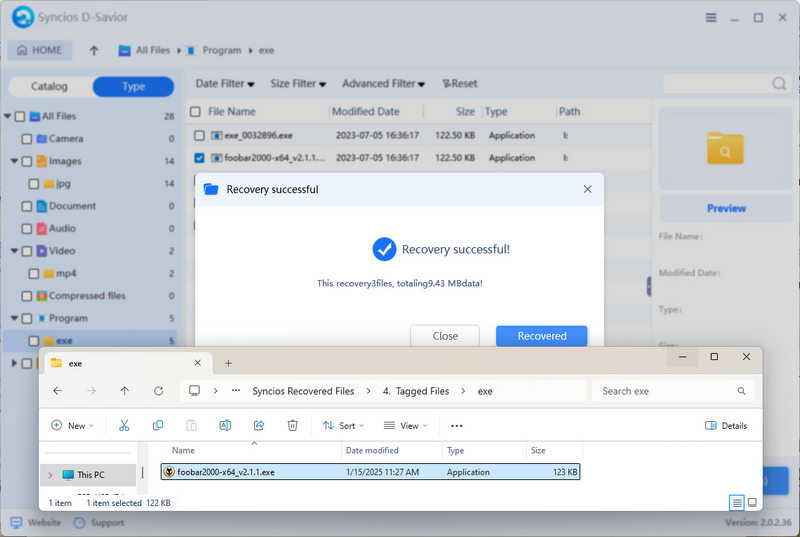
Learn how to recover deleted photos, music, videos, and more contents from formatted USB flash drive from the full step-by-step tutorial.
Part 3: Recover Deleted Files from USB Flash Drive with Windows File Recovery
If you use Windows, Windows File Recovery is a good choice. This free tool from Microsoft, although relatively professional in operation, supports recovering deleted or formatted files from USB flash drives. However, it does not have an intuitive interface and can only be used through the command line interface to specify the scan location and file type for targeted data recovery.
System requirements: Windows 10 version 2004 or later
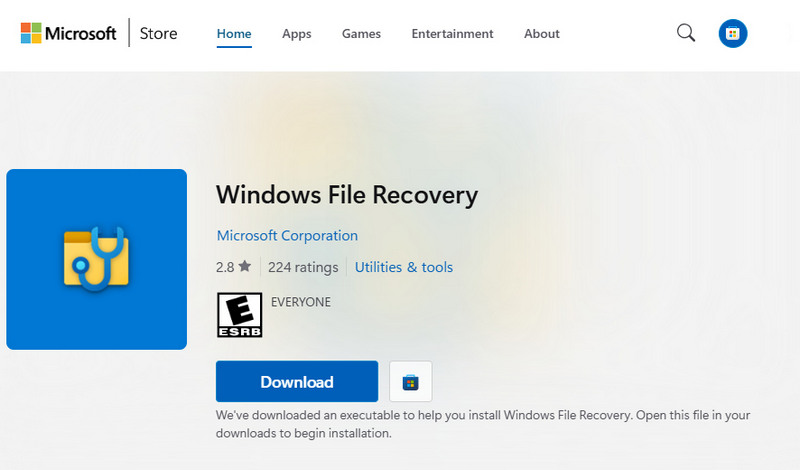
- Step 1: Download Windows File Recovery from the Microsoft Store. After downloading, install it on your computer. Connect your USB flash drive to your computer.
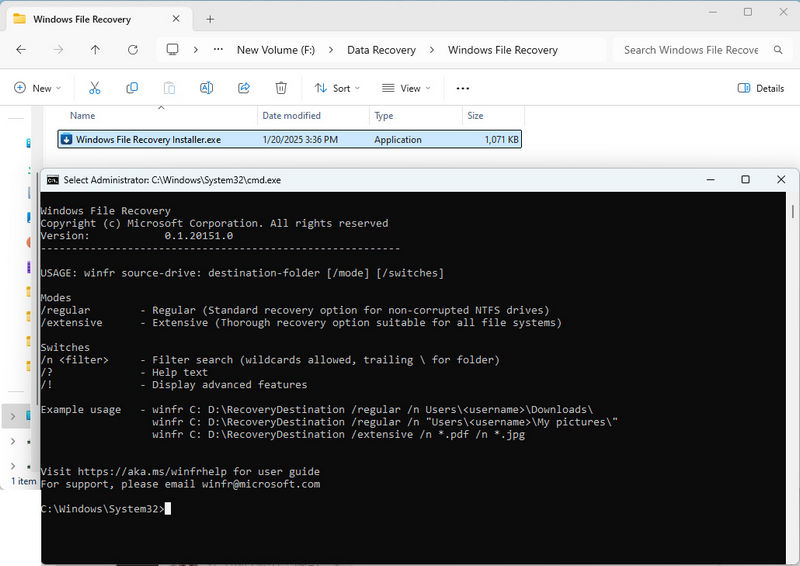
- Step 2: After installation, click the installation package file to directly launch the program's command interface. If you want to find it quickly later, search for "Windows File Recovery" in the Start menu and double-click the app to start.
- Step 3: There are two modes: Regular and Extensive. /Regular mode is used to try to recover recently deleted files, and the metadata of the file system is still available. /Extensive mode is used for deeper scanning and may be able to recover some files that cannot be found in regular mode. Neither mode directly supports recovering files by path. It scans the entire drive to be recovered and tries to recover all recoverable files to the specified path. Now let's take an example to explain how to do it in detail.
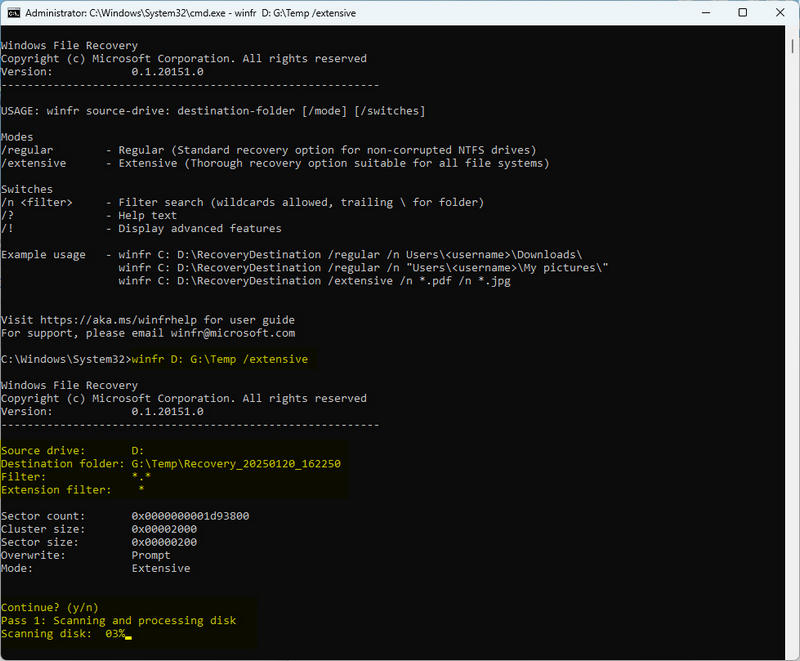
- We will show how to scan the D drive (the USB Flash Drive) and recover data to G:\Temp.
- If you want to quickly scan and recover, enter the following command and press "Enter":
- winfr D: G:\Temp /regular
- If you need to deeply scan and recover the entire USB flash drive, enter the following command and press "Enter":
- winfr D: G:\Temp /extensive
- If you need to deeply scan and recover a certain file type in the entire USB flash drive, enter the following command and press "Enter":
- winfr D: G:\Temp /extensive /n *.pdf /n *.jpg
- Step 4: When prompted
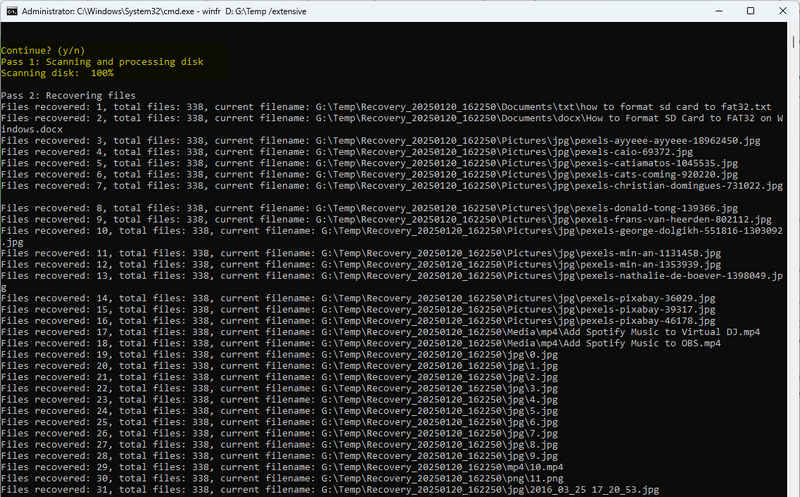
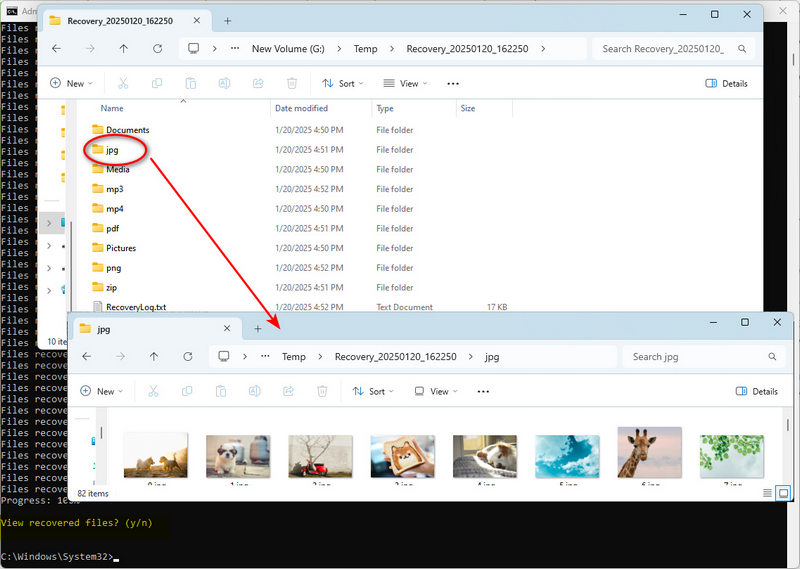
Continue? (y/n), typey, then hit "Enter". The recovery process may take some time, depending on the size of your USB flash drive and the number of deleted files. - Step 5: After the process is completed, you will see
View recovered files? (y/n), typey, then hit "Enter". The folder where the recovered files are stored will open automatically. Windows File Recovery will create a folder named "Recovery_(date_time)" in the destination drive. All recovered files are categorized by type. If the folder was previously formatted, most files will lose their file names. - By following the above steps, you should be able to use Windows File Recovery tools to recover as many files as possible. However, for more complex cases, or if you are not sure how to proceed, seeking professional data recovery services may be a better choice.
Part 4: Recover Deleted Files from USB Flash Drive with CMD
If you accidentally deleted some files on your USB flash drive, or found that some files suddenly disappeared, don't worry, you can try to use CMD (that is, Command Prompt) to retrieve them. There are some special commands in CMD, such as chkdsk and attrib, which can help you recover files that were accidentally deleted or hidden to a certain extent. However, this method is more suitable for dealing with some simple data loss situations, and may not work if the data is seriously damaged.
4.1: Recover files with the chkdsk command
The chkdsk command is like a doctor for the disk. It can check errors on the disk and try to repair them. Sometimes, files are lost because of some minor problems on the disk.
- Step 1: Plug your USB flash drive into the computer.
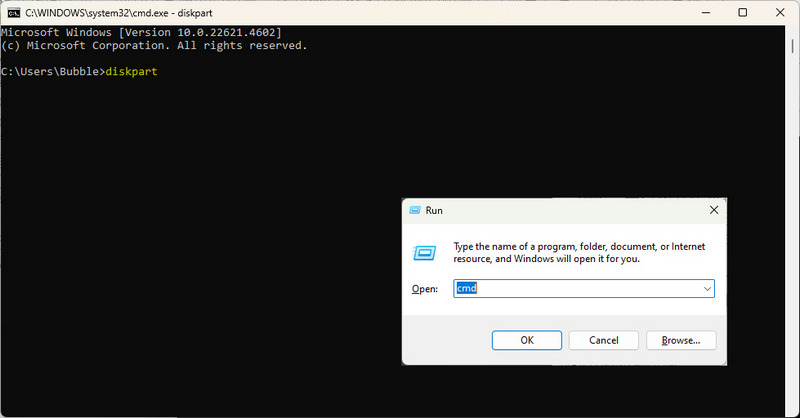
- Step 2: Press "Win + R" keys, and a small Run window will pop up. Type "cmd" in it and press Enter to open the command prompt.
- Step 3: In the command prompt, first type
diskpartand then press "Enter". - Step 4: Then type
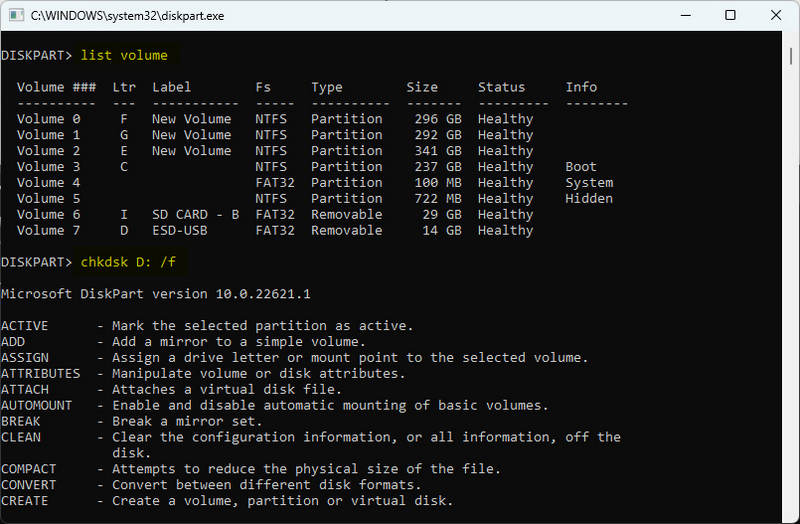
list volume, so that you can see all the drives connected to the computer, as well as their names and drive letters. Find the drive letter of your USB flash drive, such as D: or E:. - Step 5: Now, type
chkdsk D: /f(remember to replace D: with the drive letter of your USB flash drive) and press Enter. The /f parameter tells chkdsk to try to fix any errors it finds. - Step 6: Chkdsk will begin scanning your drive and try to fix any errors it finds. This process may take a while, depending on how large your drive is and how many errors it has.
- Step 7: After the scan is complete, open your USB flash drive and see if the deleted files are back.
4.2: Use the attrib command to recover hidden files
Sometimes, files are not actually deleted but are set as hidden files so that you can't see them. The attrib command can help you remove the hidden attributes of these files and make them visible again.
- Step 1: Plug your USB flash drive into your computer first.
- Step 2: Open the Command Prompt in the same way as above, press "Win + R", type "cmd", and press "Enter".
- Step 3: Type
diskpartand then press "Enter". Then typelist volume. - Step 4: Determine the drive letter of your USB flash drive in the same way as above with chkdsk.
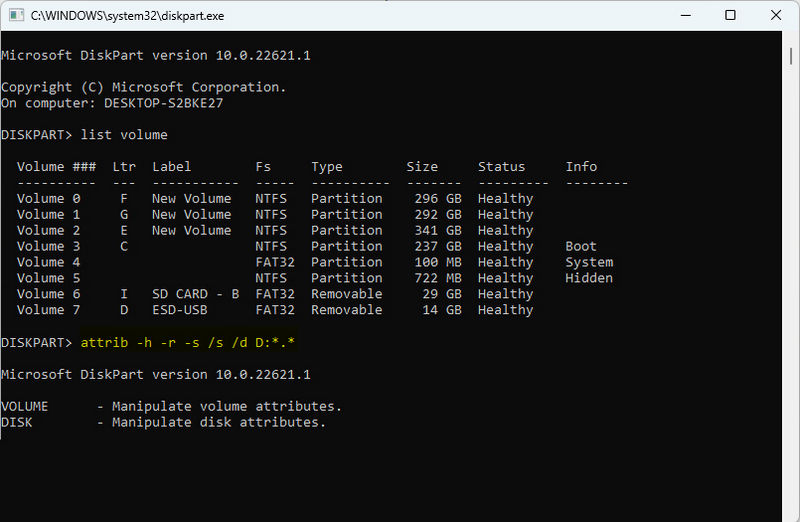
- Step 5: Type
attrib -h -r -s /s /d D:*.*(remember to replace D with the drive letter of your USB flash drive) and press Enter. This command will remove the hidden, read-only, and system attributes from all files and folders, and it will also check all subdirectories and files to make sure nothing is missed. - Step 6: Now, open File Explorer and find your USB flash drive. The files that were previously hidden should be visible.
Part 5: Restore Deleted Files from USB Flash Drive from Windows Backup
If you've been making regular backups, either for your USB flash drive or your entire system, now is the time to use them. Windows has built-in features that will make it easy to roll back to a previous state. Let's take a look at the steps to restore.
- Step 1: Insert your USB flash drive into your computer's USB port.
- Step 2: Type "Control Panel" into the Windows search box and click on the corresponding option in the search results to open it.
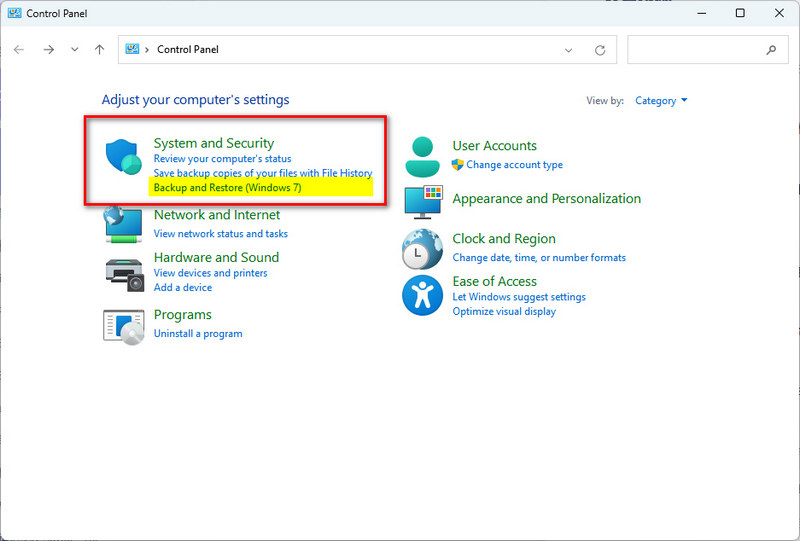
- Step 3: In the Control Panel interface, look for and click on "Backup and Restore (Windows 7)" under the "System and Security" section.
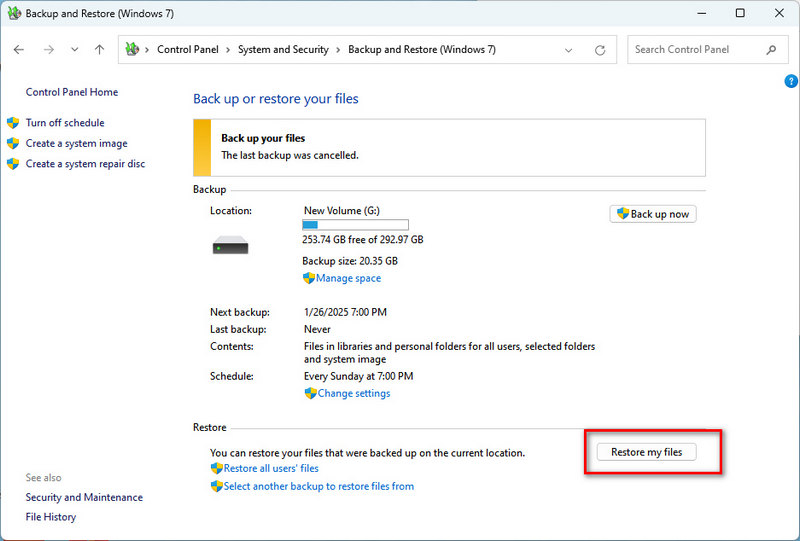
- Step 4: Once in the Backup and Restore interface, select the option to "Restore my files".
- Step 5: In the pop-up window, you need to browse and select the location where the previous backup files are stored. This is usually a backup drive you set up previously or a network location.
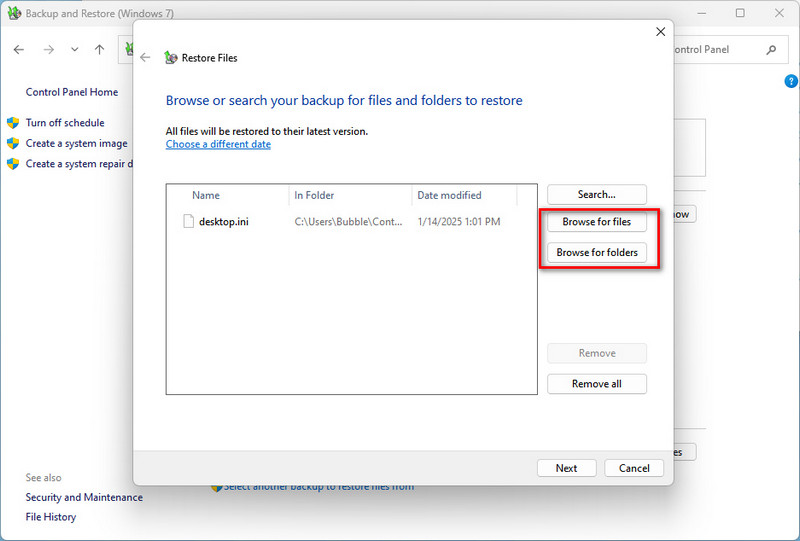
- Step 6: Then click "Browse for files" or "Browse for folders" to locate the file or folder you need to restore.
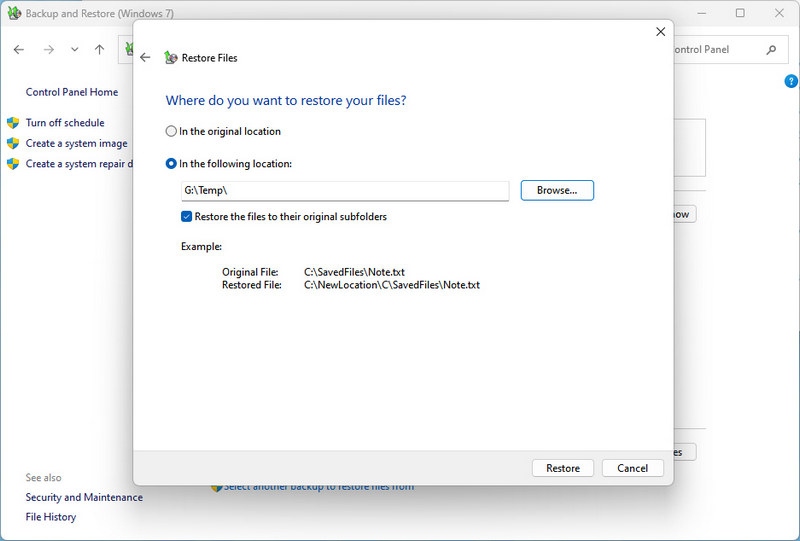
- Step 7: Next, in a pop-up dialog box, select the destination to which you want to recover the files. Tick off "In the original location" or "In the following location". If you choose the latter, you will need to manually select an output path. You can tick off the "Restore the files to their original subfolders" option, then hit "Restore" to initiate the recovery.
- Step 8: Finally, Windows will start the file recovery process. Once completed, click "View restored files" to view the files just recovered.
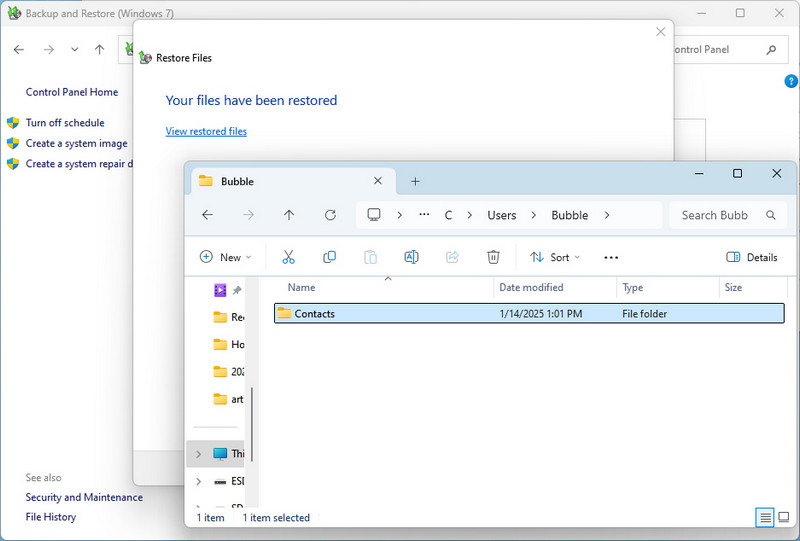
But if you don't have a backup, or the backup file is incomplete, then you can consider using professional data recovery software to try to recover deleted files on the USB flash drive. However, it should be emphasized here that the success rate of data recovery software will be affected by many factors, such as the length of time since the file was deleted, the usage of the disk, and the type of file.
Part 6: Restore Deleted Files from USB Flash Drive Using Previous Versions
Using the "Previous Versions" feature to recover deleted files from a USB flash drive is a convenient way, but the premise is that your Windows system has system protection turned on and the files on the USB flash drive have been backed up by the system before being deleted. Here are the specific steps:
- Step 1: Insert the USB flash drive into the computer.
- Step 2: Go to "This PC", find the USB flash drive icon containing the lost files, right-click it, and select "Properties".
- Step 3: Click the "Previous Versions" tab in the pop-up window.
- Step 4: If the system has created a backup for the USB flash drive, you should see a list of one or more available backup versions. Browse through these versions and select a backup version you want to restore. Generally, it is safest to select the most recent date version.
- Step 5: After selecting the target version, click the "Restore" button. At this time, the system will prompt you to confirm the location of the restore.
- Step 6: Select the location you want to restore the files to as needed. Click "OK" then choose "Restore" to start restoring the selected files.
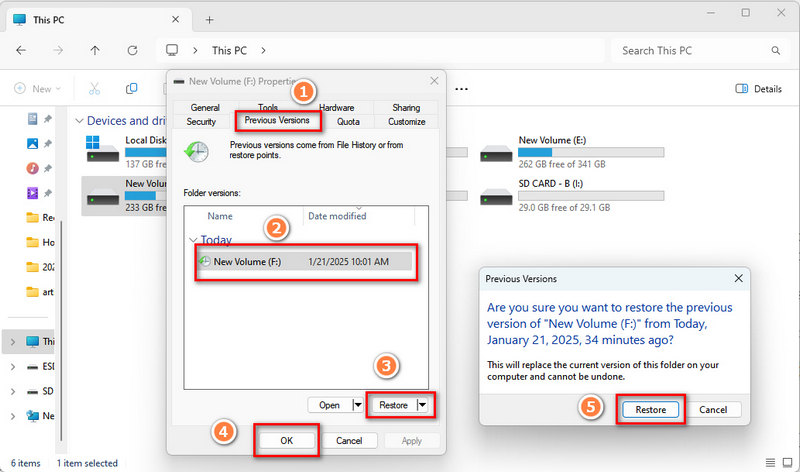
It should be noted that the "Previous Versions" feature is not a completely reliable data recovery method because it relies on the setting of system protection functions and the creation of backups. If the files on the USB flash drive were not backed up by the system before being deleted, or the system protection function was not set up correctly, you will not be able to use the "Previous Versions" function to recover the deleted files. You can only get help from a Windows data recovery tool to recover the permanently deleted files on the USB flash drive.
Part 7: Restore Deleted Files from USB Flash Drive Using File History
File History periodically snapshots changes in your personal folders, encompassing crucial data like documents and photos. Should any unexpected loss occur, simply activate this feature to swiftly pinpoint and revert to the desired files. Provided you've pre-activated File History and specified a backup location, you'll be able to easily trace back to any point in the timeline, even files that were accidentally deleted.
- Step 1: To proceed, plug a USB flash drive into your computer.
- Step 2: Next, type "Control Panel" into the Windows search box and open it.
- Step 3: Within the Control Panel, locate and click on the "File History" option under the "System and Security" category.
- Step 4: On the File History interface, select "Restore personal files" on the left-hand side.
- Step 5: The system will then list all available backup locations. Choose the one containing the files you wish to restore.
- Step 6: Navigate through the folders and files in the backup to locate what you need. Select the files or folders you want to restore.
- Step 7: If you choose to restore the files to the original location, click the "recover button" to commence restoring the selected files. If you want to restore the files to another location, click the "gear setting icon" in the upper right and choose "restore to". Then select a proper saving folder and start recovering. (Be cautious not to select the original USB flash drive as the restore location to prevent data overwrite).
- Step 8: Once restoration is complete, you can find the restored files at the designated location and verify their integrity.
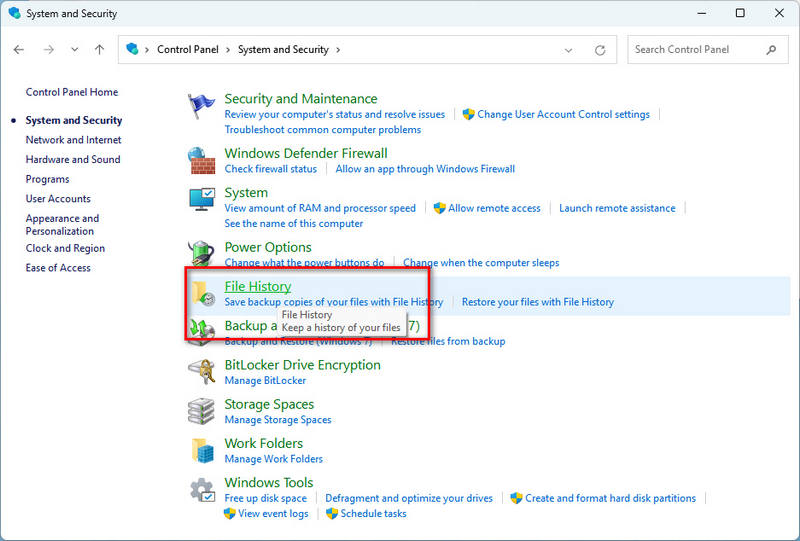
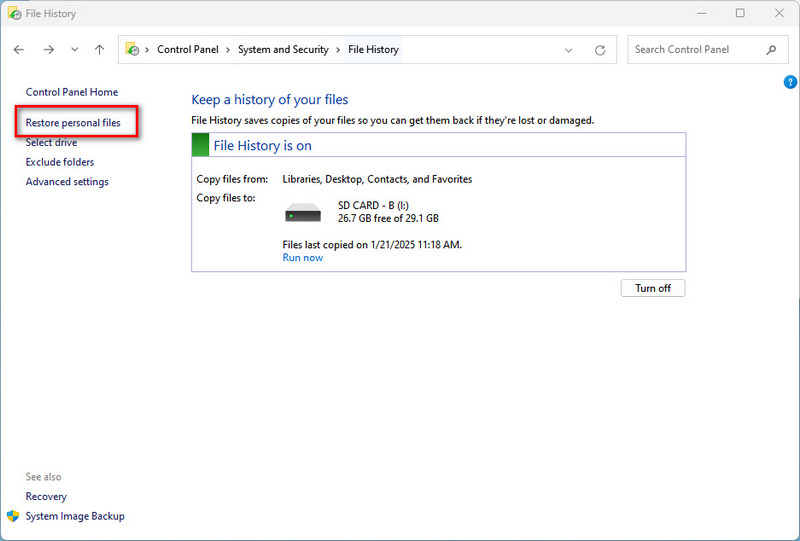
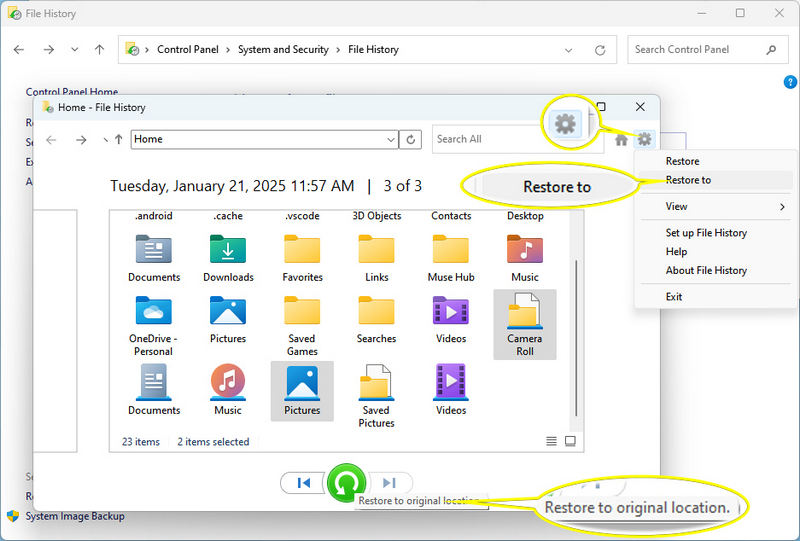
It's worth noting that File History can only recover files and folders that have been previously backed up. If files on your USB flash drive weren't backed up to File History before deletion, you can only retrieve the deleted files using a reliable Windows data recovery tool.
Part 8: Restore Deleted Files from USB Flash Drive from Time Machine Backup
Mac users also don't need to worry about data loss. The Time Machine backup service built into Apple's product line is like a reliable time machine, designed to save data, including valuable data on USB flash drives. With Time Machine, you can easily restore your Mac and its connected USB flash drive to a specific point in the past to retrieve accidentally deleted files. The operation process is simple and quick. Just connect the Time Machine backup disk to your Mac, then launch the Time Machine application, and you can browse and restore the required files according to the timeline, making data recovery a breeze.
- Step 1: Plug in your Time Machine backup drive to your Mac.
- Step 2: Navigate to the folder where the missing file was originally saved.
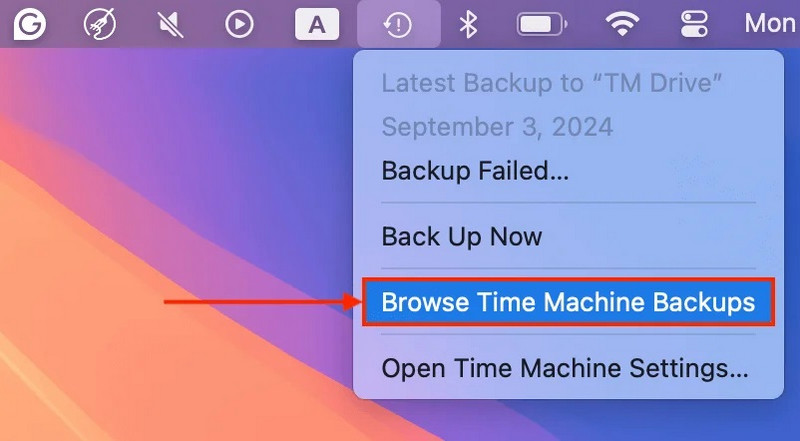
- Step 3: Click on the Time Machine icon in the menu bar and select "Browse Time Machine Backups".
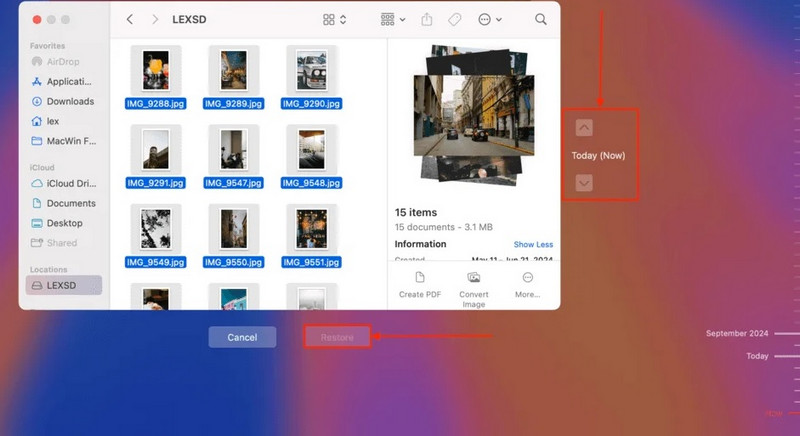
- Step 4: Use the timeline on the right to scroll back through your backups until you find the file you need.
- Step 5: Select the file, then click the "Restore" button to bring it back to its original spot.
Besides relying on iCloud and Time Machine, it’s a good idea to regularly review any manual backups you’ve made on external drives or cloud services like Google Drive or Dropbox. Keeping multiple backups can really save the day when you least expect it.
Conclusion
Through the various methods and techniques introduced above, I believe that in most cases we can successfully retrieve our valuable data. In order to prevent similar problems in the future, it is essential to develop good data management habits. If you don't have any backups, feel helpless, and are not familiar with any computer skills, Syncios D-Savior will always be your first choice. Download it now to scan your USB flash drive! Scan deleted data earlier, recover earlier, and avoid irreparable losses.


