Syncios D-Savior - Windows Data Recovery Expert
 >
How to >
PC Recovery >
How to Format SD Card to FAT32 on Windows/Mac/Linux
FAT32 is widely employed across various operating systems, including Windows, macOS, Linux, and others, making it a top choice for formatting SD cards. Additionally, when selecting a storage medium for dashcams, surveillance cameras, and other portable devices, FAT32 SD cards exhibit exceptional performance. Regardless of the reasons for formatting an SD card to FAT32, the answer remains clear. Continue reading to discover the precautions you should take before formatting your SD card to FAT32, methods for formatting, and how to recover important files accidentally deleted during the process.
- Part 1: Pre-Formatting SD Card to FAT32
- Part 2: How to Format SD Card to FAT32 on Windows 10/11
- Method 1. Format SD Card to FAT32 with Windows Disk Management [32GB or Smaller]
- Method 2. Format SD Card to FAT32 with Windows File Explorer [32GB or Smaller]
- Method 3. Format SD Card to FAT32 with Diskpart [32GB or Smaller]+[64GB/128GB or Larger]
- Method 4. Format SD Card to FAT32 with GUIFormat [64GB/128GB or Larger]
- Method 5. Format SD Card to FAT32 with HP USB Disk Storage Format Tool [64GB/128GB or Larger]
- Part 3: How to Format SD Card to FAT32 on Mac
- Part 4: How to Format SD Card to FAT32 on Linux
- Part 5: How to Recover Lost Data after Formatting SD Card to FAT32
Part 1: Pre-Formatting SD Card to FAT32
Backup Important Data: Prior to formatting, ensure you back up any important files from the SD card, as the formatting process will erase all existing data. Once the existing files are erased, regret won’t help. Stay calm, immediately stop using the SD card to prevent new data from overwriting the deleted files, and perform a quick scan using reliable data recovery software to recover the lost files as soon as possible. Acting swiftly increases your chances of successful recovery.
Confirm Device Compatibility: Verify that your device supports FAT32 formatting. Although FAT32 is broadly compatible across many systems, certain older or specialized devices might not support it.
Assess SD Card Capacity: Keep in mind that FAT32 imposes a file size limit of 4GB. If you plan to store files larger than this, you should consider using formats such as exFAT or NTFS instead.
Part 2: How to Format SD Card to FAT32 on Windows 10/11
This section introduces five ways to format SD cards of different capacities. Because when formatting 32GB or smaller SD cards, you only need to take a simpler approach. But for 64GB or larger SD cards, Windows will not offer the FAT32 option by default, because the FAT32 standard itself limits a single partition to no more than that size. You need some extra help to proceed. This section will explain all the relevant details and take you through the process of formatting the SD card to FAT32.
Method 1. Format SD Card to FAT32 with Windows Disk Management [32GB or Smaller]
For managing and formatting SD cards that are 32GB or smaller, using the built-in Disk Management tool in Windows is the first choice recommended by any relevant tutorial. This is because the process does not involve any additional tools and is simple and efficient.
- Step 1: Insert the SD card into the card reader of your computer.
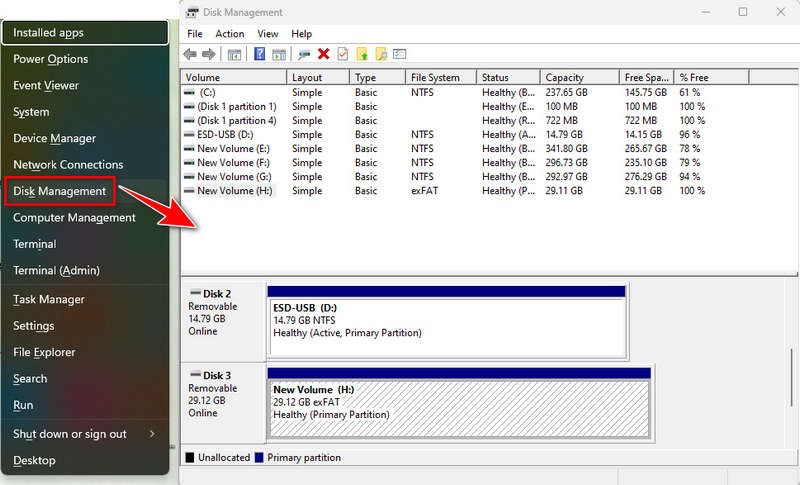
- Step 2: Press the "Win + X" keys and select "Disk Management" from the menu.
- Step 3: Locate your SD card in the Disk Management interface.
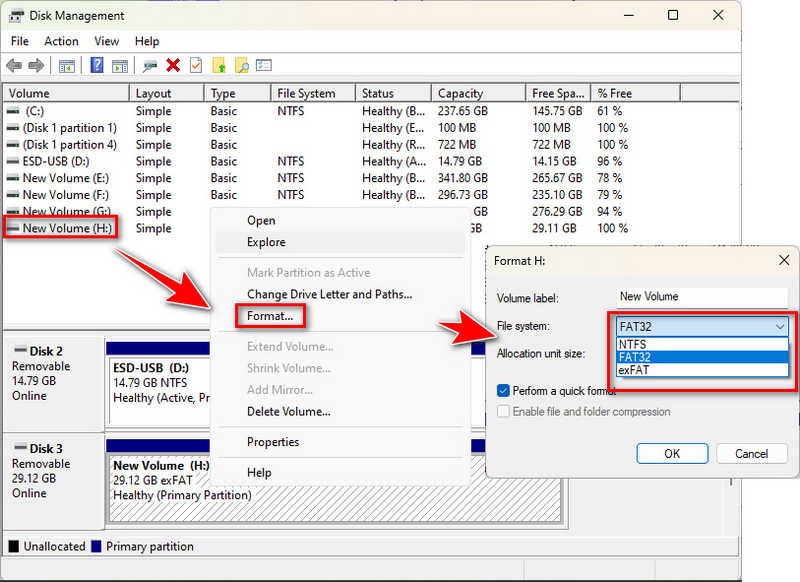
- Step 4: Right-click the partition of the SD card and select the "Format" option.
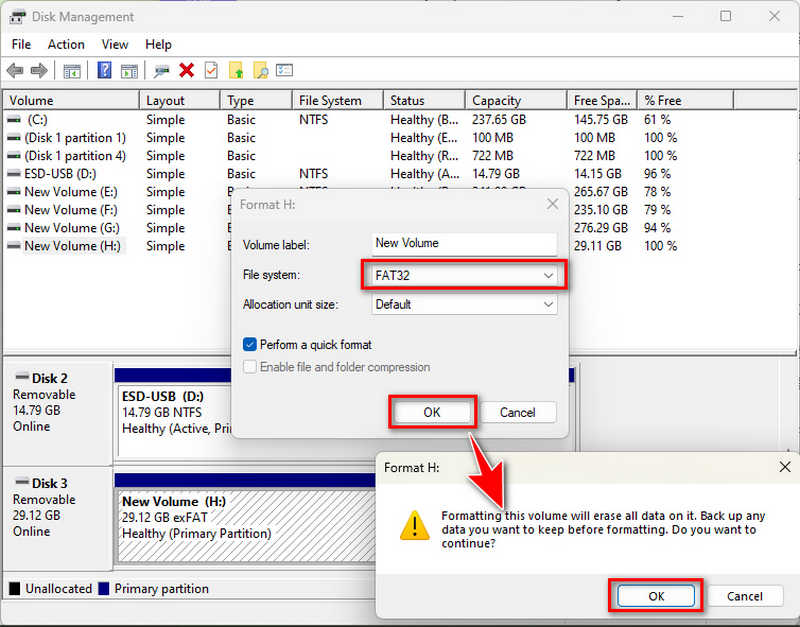
- Step 5: In the format window that appears, you can set the name of the SD card (i.e. volume label) and select the file system as "FAT32".
- Step 6: To avoid frustration and regret after the files are cleared, make sure that you have backed up all necessary files. Click "OK" to start the formatting process.
- If you forgot to back up important files after formatting your SD card, don't panic. Syncios D-Savior can recover lost files from the formatted SD card before data gets overwritten.
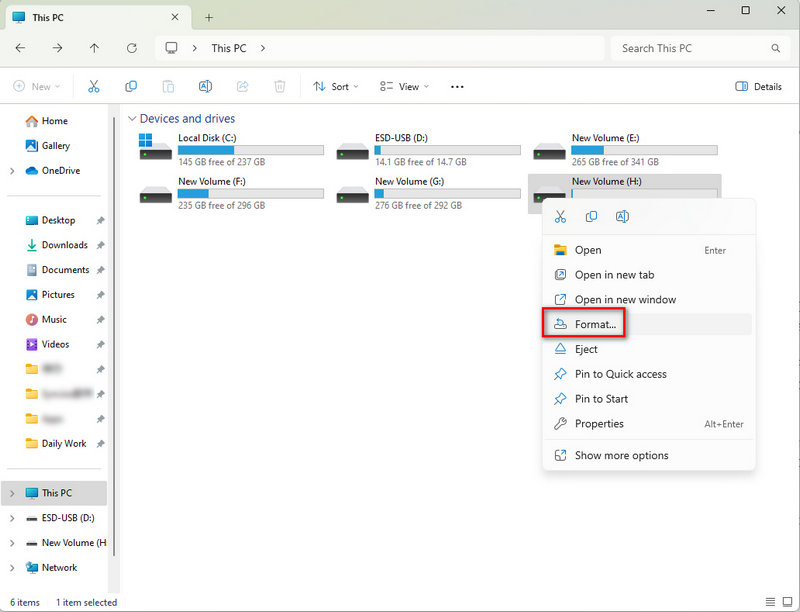
Method 2. Format SD Card to FAT32 with Windows File Explorer [32GB or Smaller]
- Step 1: Insert the SD card into your computer's SD card reader.
- Step 2: Open File Explorer (you can open it by clicking the folder icon on the taskbar or by pressing the Win + E shortcut).
- Step 3: In the left navigation pane of File Explorer, find and click "This PC" or "My Computer".
- Step 4: You should see the connected SD card. Right-click the drive letter of the SD card and select "Format" from the context menu.
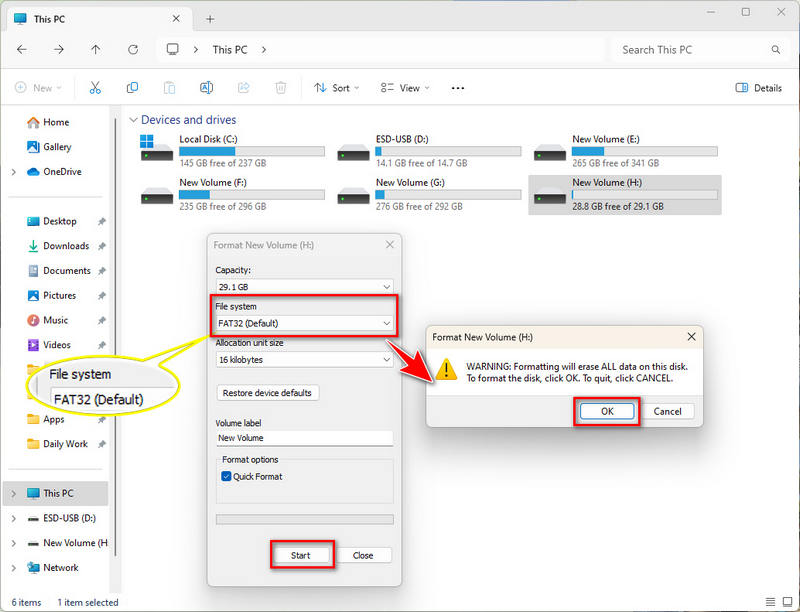
- Step 5: In the "Format" window, make sure the "File System" drop-down menu is set to "FAT32". If you don't see the FAT32 option, you may need to use the Command Prompt or another tool to format to FAT32.
- Step 6: In the "Allocation Unit Size" drop-down menu, you can usually select "Default" to let Windows decide the best value.
- Step 7: If you want, you can give the volume a name, which will be displayed as the name of the SD card on your computer.
- Step 8: Make sure all data is backed up, as formatting will delete all data on the SD card.
- Step 9: Click the "Start" button to initiate the formatting process.
- Step 10: A warning dialog box may appear to remind you that formatting will delete all data, and confirm to continue. Once the formatting is complete, your SD card will be ready with the FAT32 file system and can be used with devices compatible with that file system.
- No need to worry if you missed backing up files post-format. Syncios D-Savior helps retrieve numerous file types from your formatted SD card until data is overwritten.
Method 3. Format SD Card to FAT32 with Diskpart [32GB or Smaller]+[64GB/128GB or Larger]
Formatting with Windows Disk Management and File Explorer is indeed simpler and more intuitive, suitable for the daily needs of most users. However, Diskpart provides fine-grained control at the command line level, which can solve difficult problems that graphical interface tools cannot handle. In addition, Diskpart supports batch processing and script automation, which is suitable for situations where multiple storage devices need to be managed frequently. It also provides more powerful operating capabilities in the case of non-standard or damaged partitions. For users who are familiar with the command line, Diskpart provides a more direct and efficient management method.
Furthermore, the Diskpart tool formats a 32GB or smaller SD card to the FAT32, and can also bypass the limitation that Windows cannot format 64GB/128GB or Larger to FAT32. So although this command-based tool seems difficult to control, many professionals are still keen to use this tool because it can break many limitations. However, be careful during the process and make sure to select the correct disk and partition to avoid data loss or system damage. If you are not sure how to do it, it is recommended to consult a professional or refer to the two more intuitive methods above.
- Step 1: Insert the SD card into your computer's SD card slot, or connect the SD card to your computer using a card reader.
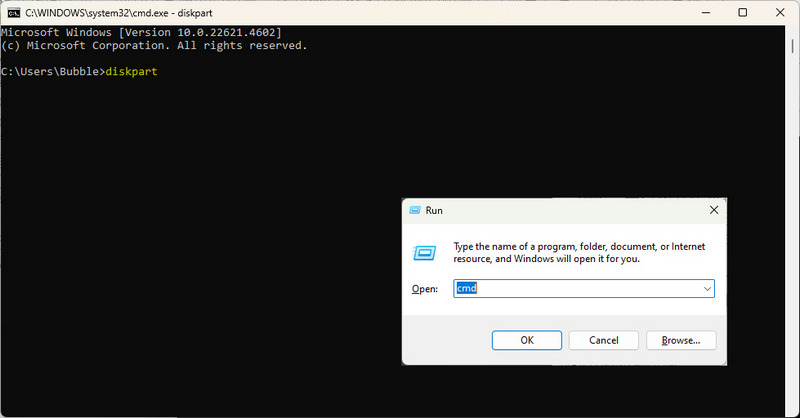
- Step 2: Press "Win + R" and type "cmd" in the search box.
- Step 3: In the Command Prompt window, type
diskpartand press Enter to launch the Diskpart tool. - Tips: There is another quick way to access DiskPart. Find the search box in the lower left corner of your Windows PC. Type "diskpart". Click on the "diskpart" tool directly from the search results to launch it. This will open the DiskPart tool directly without having to manually enter the diskpart command through the Command Prompt or PowerShell.
- Step 4: Type
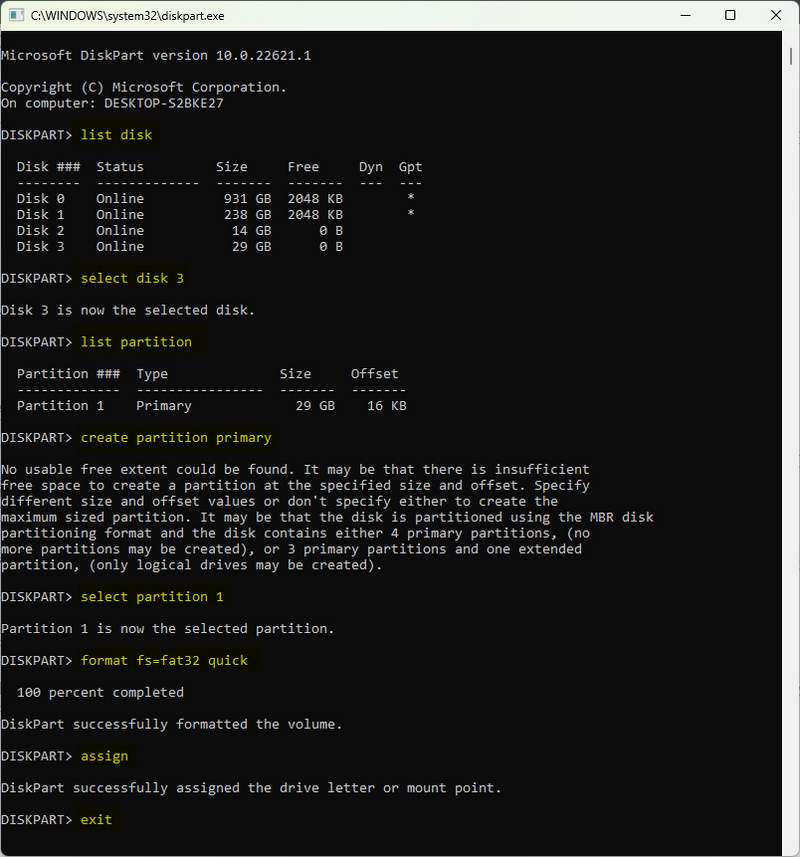
list diskand press "Enter" to list all connected disks. Confirm the disk number corresponding to the SD card you want to format. - Step 5: Type
select disk X(replace X with the actual disk number of your SD card) and press "Enter" to select that disk. - Step 6: Type
list partitionand press "Enter" to list all partitions on the selected disk. For a new SD card, there may be only one unallocated partition or no partitions. - Step 7: If there are no partitions on the SD card, skip this step. If there are partitions on the SD card, you may need to delete them first. Type select partition Y (where Y is the number of the partition you want to delete) and press "Enter" to select it. Then type delete partition and press "Enter" to delete the partition. Repeat this step until all partitions are deleted.
- Tips: Instead, you can enter the
cleancommand to clear all partitions and information on the selected disk. Make sure you select the correct disk to avoid deleting data by mistake. - Step 8: Type
create partition primaryand press "Enter" to create a new primary partition on the SD card. If you are prompted with "No usable free extent could be found...", you can ignore this step and proceed to the next step. - Step 9: Type
select partition 1(usually the newly created partition will be partition 1) and press "Enter" to select it. - Step 10: Type
format fs=fat32 quickand press "Enter" to quickly format the selected partition to FAT32 format. If you want a more thorough format (although it will be slower), you can omit the quick parameter. - Step 11: Wait for the formatting process to complete. Diskpart will display the formatting progress and results.
- Step 12: Finally, type
exitand press "Enter" twice to exit Diskpart and the Command Prompt window. - Forgotten to backup files after formatting? Relax. Syncios D-Savior can restore a wide range of files from your SD card before new data covers them.
Method 4. Format SD Card to FAT32 with GUIFormat [64GB/128GB or Larger]
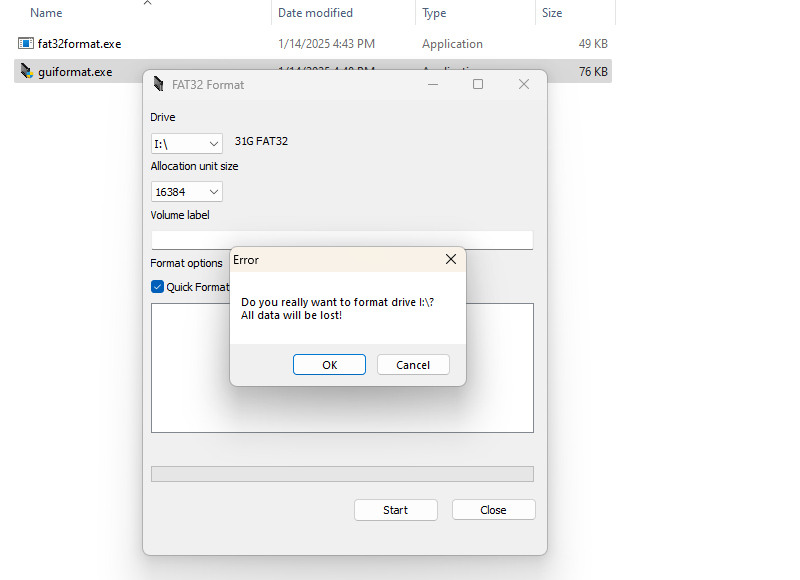
GUIFormat is a powerful tool designed for efficient formatting of storage devices to FAT32, suitable for large USB flash drives or SD cards. Whether obtained through official channels or third-party platforms, it can easily handle the formatting needs of large-capacity storage devices. For example, it can smoothly convert a 64GB or 128GB SD card to FAT32 format. In addition, GUIFormat provides a portable version, so that users can choose the most suitable usage method according to their needs - you can install it on your personal computer or use its portable version directly on mobile devices. Here are the detailed steps to format a 64GB or 128GB SD card to FAT32 using GUIFormat.
- Step 1: Firstly, download GUIFormat (known as FAT32 Format Tool before) for free. Open the website, click the picture to download the app file. If this download is blocked by your browser, you need to allow it and keep downloading. Double-click on the guiformat.exe file to directly launch the GUIFormat tool.
- Step 2: Select the drive you want to format on the interface and optionally add a volume label to it for easy identification.
- Step 3: Check the "Quick Format" option, which will speed up the entire formatting process, and then click the "Start" button to proceed.
- Step 4: At this point, a warning window will pop up saying, "Do you really want to format this drive xxx? All data will be lost!" Read the message carefully, make sure you have backed up important files, and then click "OK" to confirm the formatting process.
- Step 5: GUIFormat will then begin the formatting process. Please wait patiently until it is complete. Once the format is successful, you can safely remove the storage device and immediately start using the SD card that has been converted to FAT32.
- Don't fret over forgotten backups after formatting. Syncios D-Savior recovers multiple file types from your SD card as long as the data isn't overwritten.
It should be noted that although FAT32 has a certain limit on the size of a single file (usually 4GB), GUIFormat uses its unique algorithms and technologies to effectively format large storage devices such as 64GB or 128GB SD cards to FAT32 to meet various specific needs. For these large-capacity cards, the above steps also apply to ensure that you can complete the formatting smoothly.
Method 5. Format SD Card to FAT32 with HP USB Disk Storage Format Tool [64GB/128GB or Larger]
Another reliable option to format large SD cards to FAT32 is the HP USB Disk Storage Format Tool. This versatile tool was originally developed by HP and supports a variety of storage devices, including SD cards, USB, and more. You can format SD cards to FAT32 or NTFS.
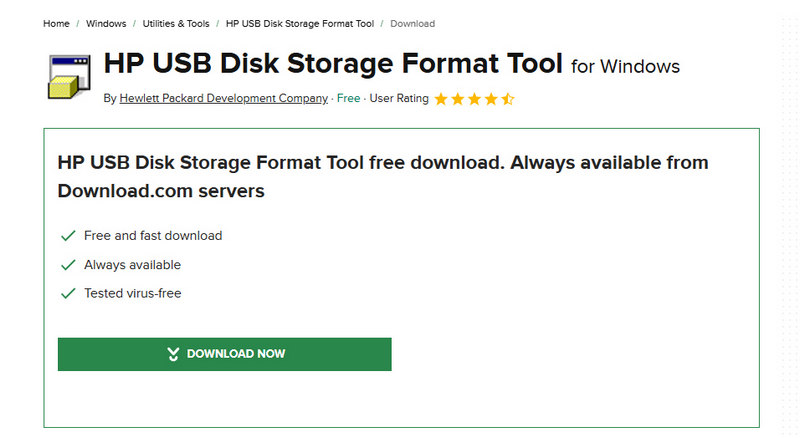
- Step 1: Download HP USB Disk Storage Format Tool from the website. If the first click does not start the download, you need to ignore the ad window and click the download button again.
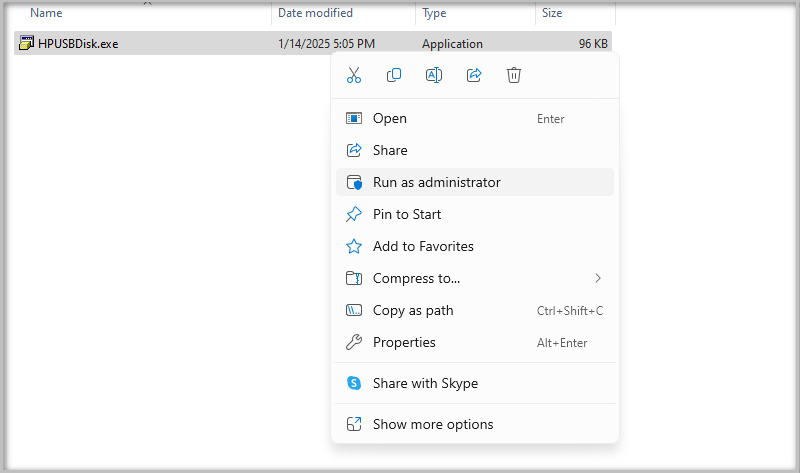
- Step 2: Right-click the downloaded program and select "Run as Administrator". Otherwise, it will not start properly.
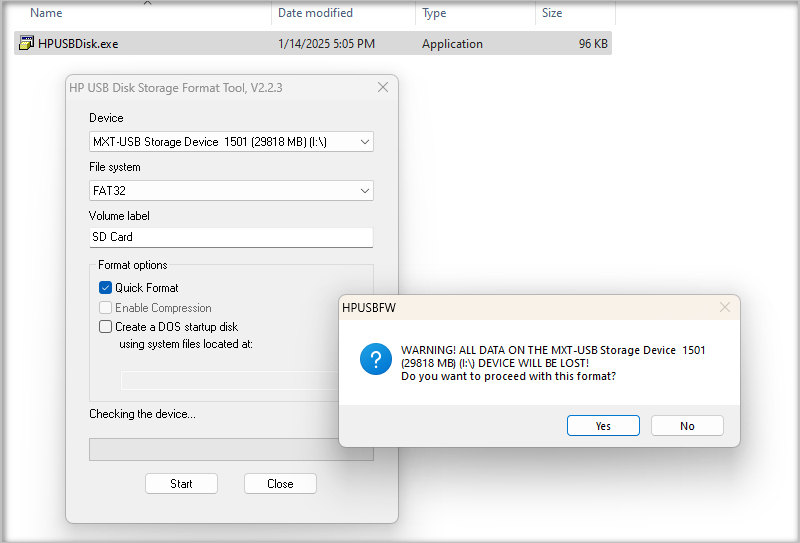
- Step 3: Select "Device" and select "FAT32" in the "File System" column.
- Step 4: Rename this device by entering a new "Volume Label".
- Step 5: Check "Quick Format" and click "Start".
- Step 6: When prompted, you will lose all data, if you want to continue formatting, click "OK" to confirm. This 64GB/128GB or larger SD card will be formatted as FAT32.
- If formatting left you without a backup, stay calm. Syncios D-Savior can rescue diverse file formats from your SD card until it's too late due to new data.
Part 3: How to Format SD Card to FAT32 on Mac
- Step 1: Insert the SD card into the SD card slot of your Mac or connect it to the USB port of your Mac using a card reader.
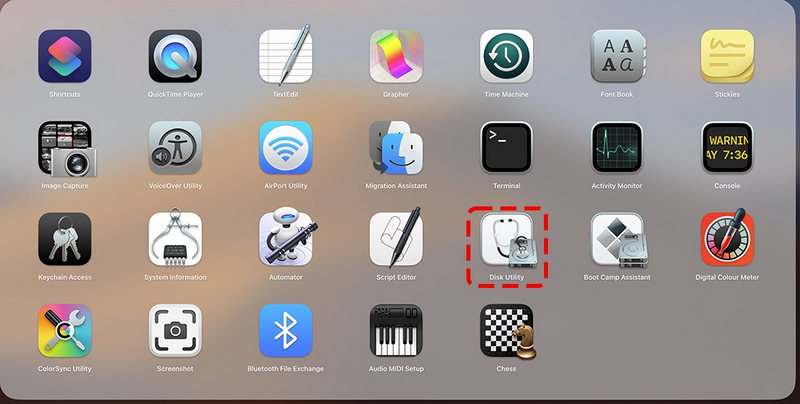
- Step 2: Open the "Applications" folder, find and open "Disk Utility" in "Utilities".
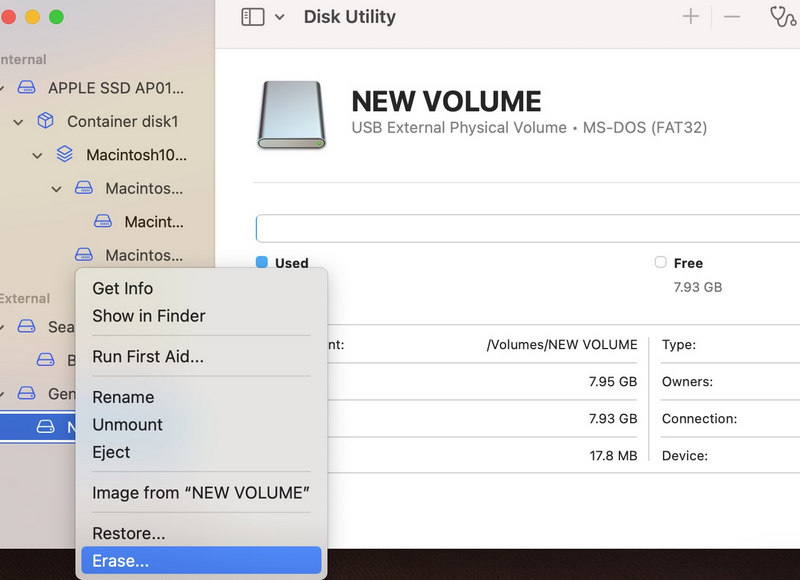
- Step 3: In the "Disk Utility" window, the left column will show all connected storage devices, find and select the SD card you want to format. Right-click on it and choose "Erase" in the pop-up menu list.
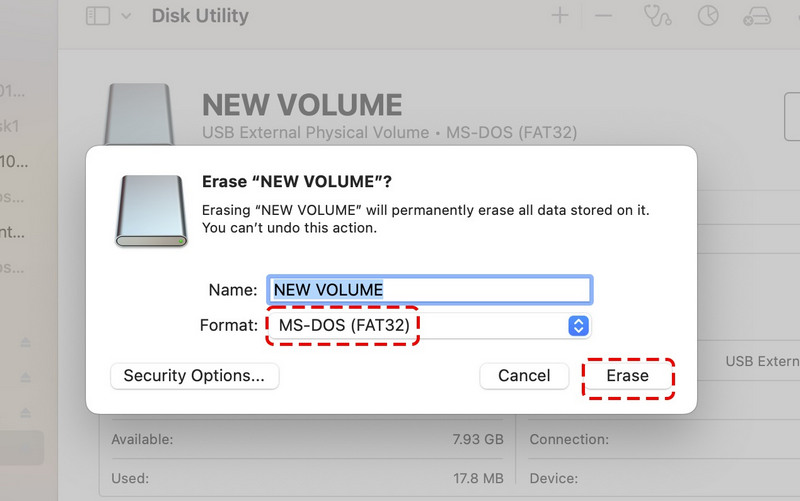
- Step 4: In the pop-up window, select "Format" as "MS-DOS (FAT32)", which is the display name of FAT32 on Mac (Note: FAT32 format can only be selected if the SD card capacity is less than or equal to 32GB, otherwise you should select exFAT).
- Step 5: Enter the new name you want to assign to the SD card in the "Name" field.
- Step 6: After confirming that all settings are correct, click the "Erase" button to start the formatting process.
- Step 7: Wait for the formatting to complete, and the SD card has been successfully formatted in FAT32 format.
Part 4: How to Format SD Card to FAT32 on Linux
- Step 1: Insert the SD card into the card reader of your Linux computer.
- Step 2: Open the terminal and type the
lsblkorfdisk -lcommand to find the device name of the SD card, which is usually displayed as/dev/sdX, where X is a letter (such as a, b, etc.). - Step 3: Use the
sudo umount /dev/sdXcommand to unmount the SD card and make sure it is not mounted (please replace/dev/sdXwith the actual device name). - Step 4: If the
dosfstoolspackage is not installed, install it first using thesudo apt-get install dosfstoolscommand. - Step 5: Use the
sudo mkfs.vfat /dev/sdXcommand to format the SD card as a FAT32 file system. Please replace/dev/sdXwith the actual device name. For SD cards larger than 32GB, you might need to usesudo mkfs.exfat /dev/sdX. - Step 6: After formatting, you can use the
lsblkcommand to view the device information to confirm that the SD card has been correctly formatted as FAT32. - Step 7: (Optional) Create a mount point and mount the SD card. For example, run
sudo mkdir /mnt/sdcardto create a mount point, and then runsudo mount /dev/sdX /mnt/sdcardto mount the SD card. (Replace/dev/sdXand/mnt/sdcardwith the actual device name and mount point.)
Part 5: How to Recover Lost Data after Formatting SD Card to FAT32
There is a certain risk associated with formatting an SD card, and the loss of important data is a common occurrence. If you opt to do nothing due to lack of a better solution, you might miss the optimal period for data recovery. Syncios D-Savior supports free scanning of formatted SD cards (FAT32, EXFAT, NTFS), USB flash drives. If you locate your lost data, it can be promptly recovered, thus avoiding unnecessary losses.
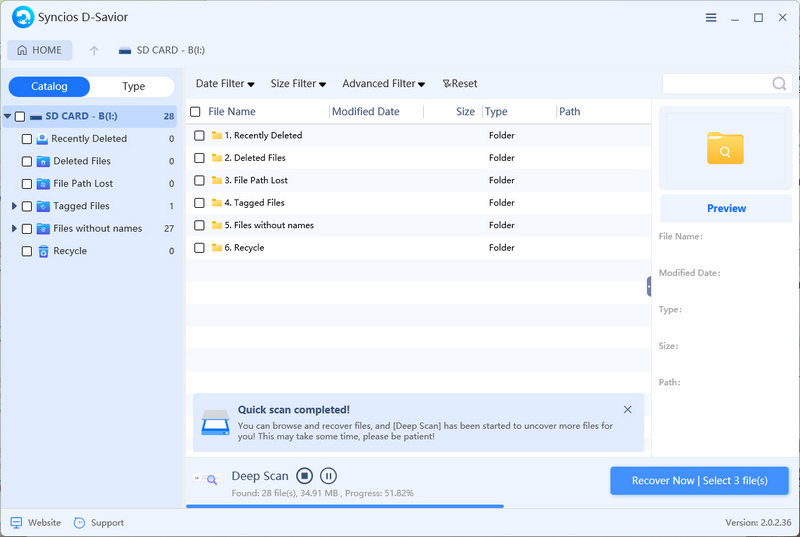
Data recovered after scanning will be organized based on file paths (recently deleted, deleted, lost filenames, lost file paths, etc.) and file types (images, audio, video, documents, applications, etc.). You can preview the data to check its integrity at any time and then selectively recover only the files you truly need, rather than restoring a multitude of unneeded files.
 Syncios D-Savior
- Recover data from a formatted disk, hard drive, lost partitions, emptied recycle bin, etc.
- Recover data from an SD card, TF card, SSD card, USB flash drive, other storage media.
- Recover 1,000+ formats of images, videos, audio, folders, archives, documents, etc.
- Save recovered data to any desired location, including external drives.
- Provide detailed file preview prior to recovery.
- Support recovering data while scanning.
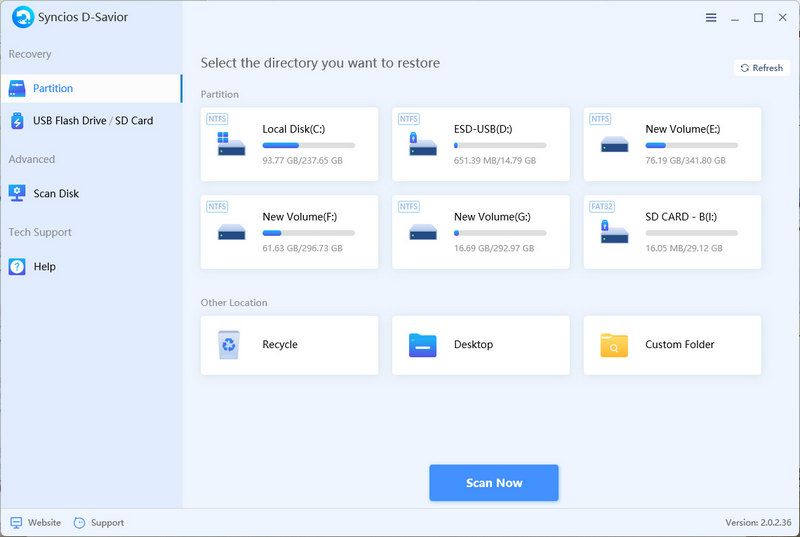
- Step 1: After installing Syncios D-Savior, launch the app and navigate to the main interface.
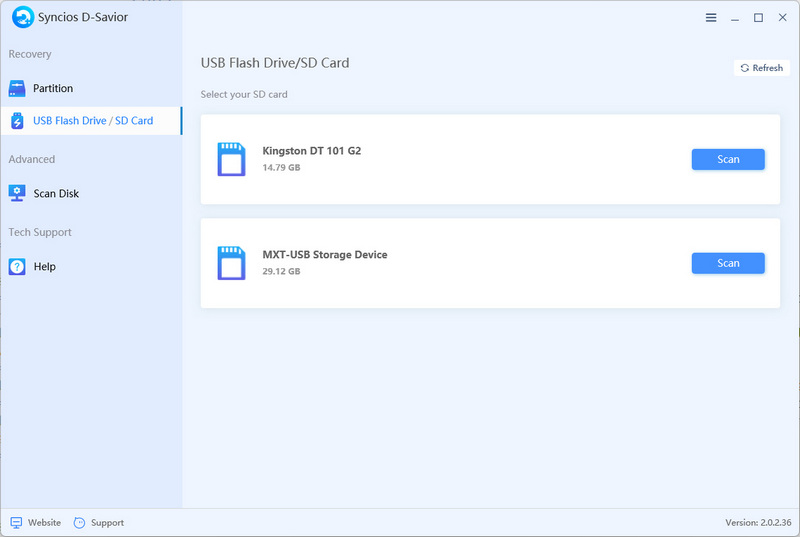
- Step 2: Locate your SD card by its name and size under the USB Flash Drive / SD Card section. Once identified, simply click the "Scan" button to begin the process.
- Step 3: After a quick scan, you can locate the previously deleted startup apps by file path or file type. As soon as the lost files are displayed, you have the option to recover them immediately without waiting for the entire scan to complete.
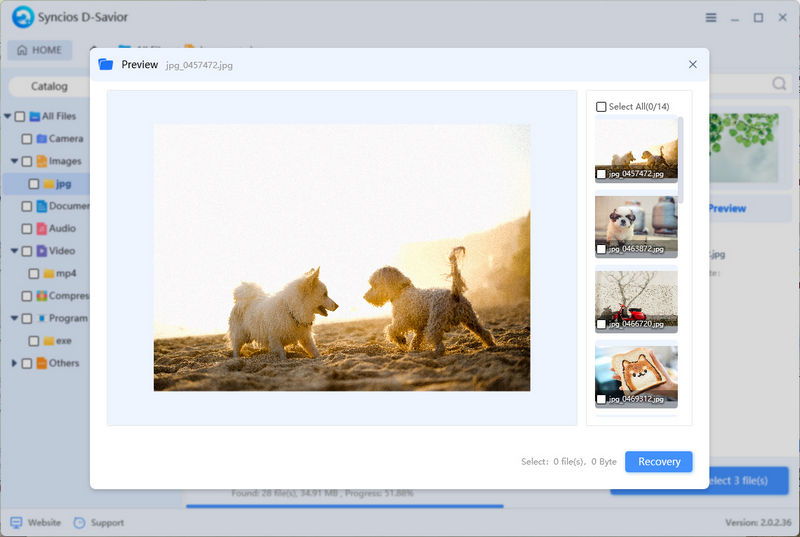
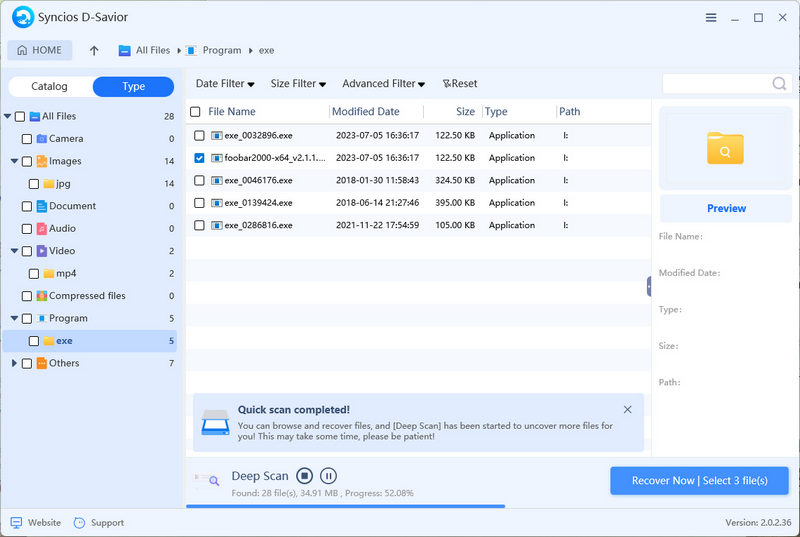
- Step 4: Select the desired files and click "Preview" in the right panel to ensure they are the items you wish to recover. Due to the formatting of the SD card, some information has been damaged, resulting in lost filenames. However, don't worry, you can still make judgments based on the file size, type, modification date, and original path to identify the files you need.
- Step 5: Once you select the wanted files, click "Recover Now".
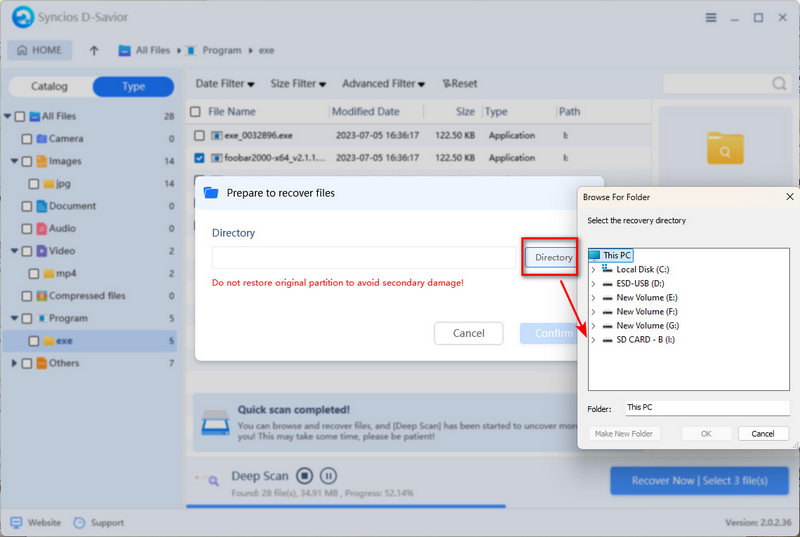
- Step 6: Then click "Directory" to specify an output folder for the recovered files. Tap "Confirm" to launch the recovery process.
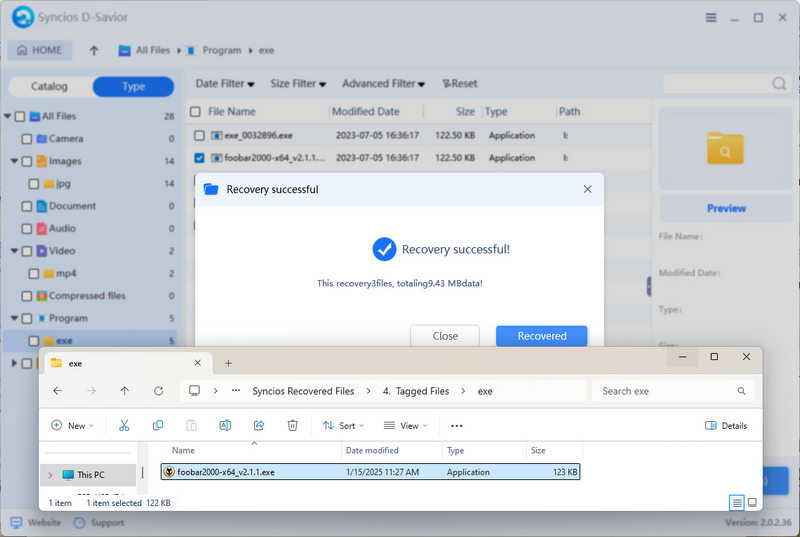
- Step 7: After the recovery process is complete and you receive confirmation, click the "Recovered" button to open the folder and check that the files have been successfully restored and are accessible.
Conclusion
Accidents happen, and sometimes formatting can lead to unintended data loss. If you’ve found yourself in this situation, don’t despair. There is an effective way to recover lost files after formatting an SD card to FAT32 performed by Syncios D-Savior. Immediately stopping the use of the SD card and using reliable data recovery software can significantly increase your chances of retrieving deleted files. Explore the recovery expert, Syncios D-Savior, to ensure your precious memories and important documents aren’t lost forever. By following these guides, you can confidently format your SD card to FAT32 while minimizing the risk of data loss and maximizing its compatibility and performance across different devices.


