![]() One management tool for all smartphones to transfer files between PC & iOS/Android devices.
One management tool for all smartphones to transfer files between PC & iOS/Android devices.

Apple has released new generation of iPhone, iPhone XS, iPhone XR and iPhone XS Max. The three new iPhone models all come with full-screen design and with a notch on the top, support FaceID. Whether it's your first time to get an iOS device or you are loyal to Apple's flagship, it will be super exciting to setup a new device after getting it hands-on. And this article gives you step by step guide to help you get all you need to do to setup your New iPhone XS or iPhone XS Max, including general settings, data migration and more. Follow the tutorial below to get your new iPhone XS or iPhone XS Max ready.
Step 1. Press lock button for a while after getting the device out of box, you will see the iPhone starts with an Apple icon on the screen, and then you'll be greeted with "Hello" in a variety of languages. Now you need to touch slide to set up to get started. Simply select your desired language, country or region, and connect to a WiFi network or Cellular network instead. Now you are allowed to choose to use Automatic Setup to set up your new iPhone with the same passcode and settings as another iPhone. Of course you can also set up your new iPhone manually with the following steps.
Step 2. You have to agree Apple's Data & Privacy information before moving on. Choose whether to Enable Location Service or not. If you Skip Location Services, you can also enable it later on Settings.
Step 3. To ensure the safety of your device and data, it's strongly to setup FaceID and a passcode. Follow the steps given to you to setup FaceID, and then a digital password will be needed as well. You can set up a standard six-digit passcode/four-digit passcode or custom passcode by tapping Passcode Options.
After done the basic settings, you will be asked to restore from a backup, set up as a new iPhone, or move data from Android. Here's how.
Option 1. Restore from iCloud backup or iTunes backup.
Obviously, which one you choose depends on whether you backup your old iPhone in iCloud or iTunes. For iCloud, tap Restore from iCloud Backup option, sign in your Apple ID and password, and choose a backup to restore, wait till the process done; For iTunes, tap Restore from iTunes Backup, you need to connect your new iPhone XS or iPhone XS Max to PC with an USB cable, and select a certain backup to restore to your device.
Option 2. Move data to iPhone 16 or iPhone XS Max from an Android device.
If you used to be an Android user who has just switched to iPhone 16 Max, Apple also welcomes you to move data from your old Android device to the new iPhone. Apple has a special app which designed for people switching from Android called Move to iOS. Here's how to move data from Android to iOS.
Step 1. Download the Move to iOS app on your Android device.
Start by downloading Move to iOS from the Google Play store. The app is supported on all phones and tablets running Android 4.0 and later.
Step 2. Transfer your content easily and safely over WiFi.
When you choose to migrate your data, your new iPhone will create a private WiFi network and find your nearby Android device running Move to iOS. After you enter a security code, it will begin transferring your content and put it in the right places.
Step 3. Get started with your new iPhone.
Once your content has been transferred, you’re ready to get going. iOS will set up your default mail account and automatically add any free apps you already own. For paid Android apps, you can purchase them if they’re available on the App Store.
Option 3. Set up your iPhone as new device.
If it's your first time to use iPhone or you don't want to move over your old device data and just want to experience the device as new, you can choose to Set Up as New. Enter your Apple ID and password. If you don't have one, you can create a new one. Tap Don't have an Apple ID? And follow the steps. You need to agree to Apple's terms and conditions to continue. Setup Apple Pay, iCloud Keychain, Siri in order, and decide to Send Diagnostic information to Apple or not, choose how you would like to view iPhone, and tap Get Started.
Of course, if you choose to set your new iPhone XS or iPhone XS Max as new iPhone, you are also able to restore from iTunes backup manually, you just need to connect your iPhone XS or iPhone XS Max to iTunes, then click on Restore Backup on the middle of the panel. But you should be noted that restore iTunes backup to your iPhone will clear all existed data.
Additional option. 1-click Transfer Data from old device to iPhone 16 or iPhone XS Max.
Actually, there is recommended third-party application that allows you to transfer data from old device including Android, iPhone, iPad, Blackberry, etc. to your new iPhone. Syncios iOS Data Transfer, designed for transferring data among iOS devices, iCloud, iTunes and computer directly, make it much easier to transfer data from an old device to a new one. Yes, only three steps needed to transfer all data from your old device to the new iPhone XS or iPhone XS Max, that is: Connect-Select-Transfer. Simply follow the steps below.
Step 1: Connect
Install the latest version of the program on your computer from below, launch it, select Transfer mode on the main interface. Then connect both of your old device and new iPhone XS (Max) to the program.
Download
Win Version
Download
Mac Version
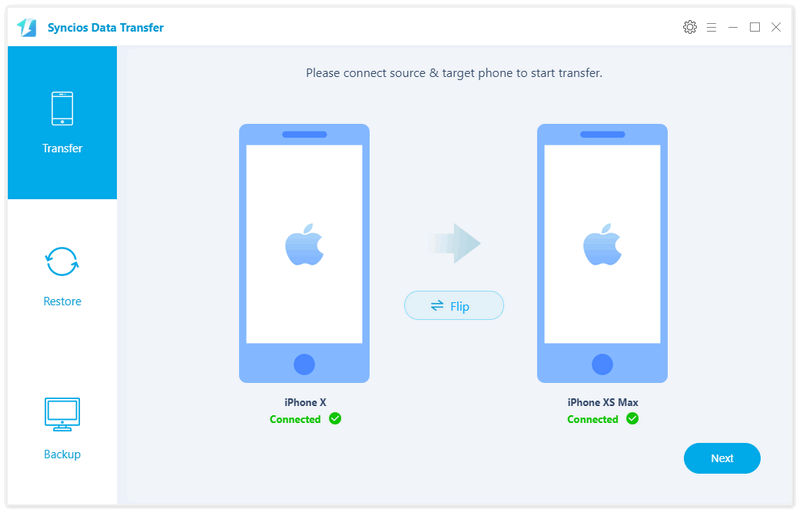
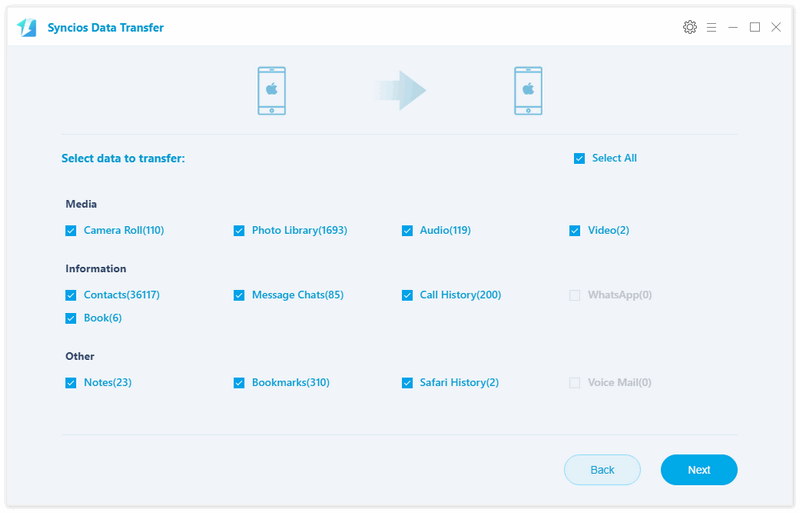
Step 2: Select
After both phones connected successfully to the program, ensure that old device is listed on the left while the iPhone XS (Max) on the right panel. If not, click on Flip button to switch the device positions. Then click Next button to continue, and select your desired contents on the middle of the panel to transfer from old device to iPhone 16 (Max). It will take time to read the data on the source device after you checked. The data supported to be transferred over depends on which device you use, you can check this page to learn more.
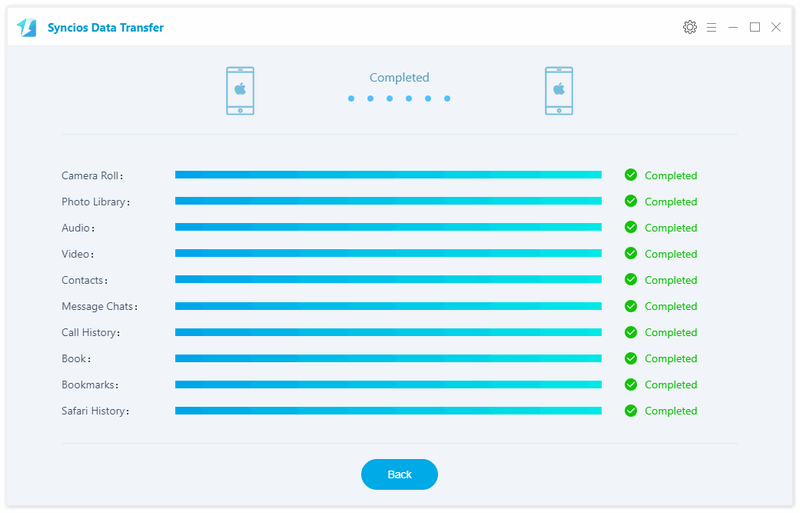
Step 3: Transfer
With all the steps above done, click Next button to continue, which will start the transferring process. Before long, all of your selected data will be transferred successfully to your new iPhone XS (Max). Moreover, this program also supports restoring data from iCloud / iTunes backup, backup & restore device, and restore iTunes library. If you are interested in these features, simply download and have a try.
If you haven't figured out how to transfer the data yet, you can check our video tutorial here.
After you got all the steps above done, your new iPhone XS or iPhone XS Max are ready for usage. If you encountered some problems or had some questions when setup your new iPhone X or iPhone XS Max, please simply leave a comment below, we will try our best to help you out. Looking forward to hear from you.